

English | 繁體中文 | Usability Survey |
![]()
Manage and install your BrownDust 2 mods directly on your phone. No PC required.
- 📱 PC-Free Operation: Unpacks, converts textures (ASTC), and repacks mods entirely on your Android device.
- 🧠 Smart Mod Grouping: Automatically scans your mod folder and groups mods by the game files they modify, preventing conflicts.
- ⚡ Batch Processing: Select and install multiple mods from different groups in a single operation.
- 👀 Live Animation Preview: Long-press any mod to preview its Spine animation before you install it.
- 🔧 Built-in Utilities: Includes tools to merge texture atlases and unpack game bundles.
- Android 8 or higher (Android 16+ may have permission problem while using shizutools).
- The latest official version of BrownDust 2 installed.
- Download the App: Download the latest
.apkfrom the Releases page and install it. - Select Mod Folder:
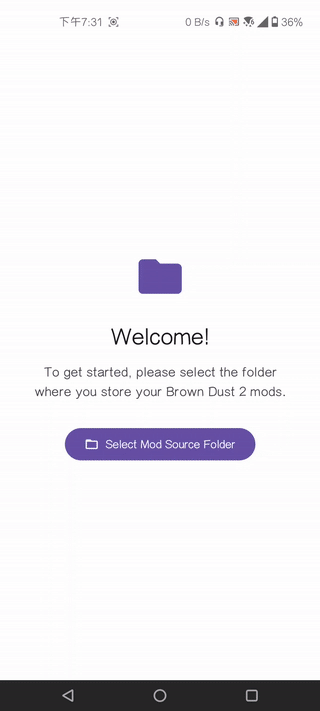
- Open the app.
- Tap the "Select Mod Source Folder" button.
- Navigate to the folder where you store your mods and tap "Use this folder".
💡 Recommendation: For best results, create a dedicated folder (e.g.,
.BD2_Mods) in your phone's internal storage and place all your mod files there.
For the app to recognize your mods, they must follow a specific structure. Each mod needs its own folder, and the filenames inside must exactly match the game's original asset names.
⚠️ Warning: All filenames must be lowercase (e.g.,char000104.png, notChar000104.png). Additionally, the image filename referenced inside the.atlasfile must also be lowercase. Otherwise, the game might crash.
Example Folder Structure:
📁 .BD2_Mods/
├── 📁 Lathel_DarkKnight_IDLE/
│   ├── 📄 char000104.skel      (or .json for the skeleton)
│   ├── 📄 char000104.atlas     (the atlas mapping file)
│   └── 🖼️ char000104.png         (the texture image)
│
└── 📁 Another_Mod/
    └── ... (other mod files)
- Select Mods: In the app, check the boxes for the mods you want to install.
- Start Repacking: Tap the floating Repack (✓) button at the bottom right.
- Wait for Processing: The app will automatically download the necessary original game files and repack your selected mods. A dialog will show the live progress.
- Manually Replace Files:
- Once complete, a new
Sharedfolder containing all your modded game files will be saved to your phone'sDownloadfolder. - You must manually move this new
Sharedfolder into the game's cache directory, overwriting any existing files. - The destination path is:
/Android/data/com.neowizgames.game.browndust2/files/UnityCache/.
Note: You will need a third-party file manager that can access
Android/datafolders. For easier access, the app provides a one-click ADB command that can be used with tools like ShizuTools. - Once complete, a new
Not sure what a mod looks like in action?
- Find the mod in the list.
- Long-press on it.
- A preview screen will open, playing the animation.
Automated with manual fallback.
The app automatically detects and merges mismatched textures during repacking, preventing most crashes. However, if a mod still displays incorrectly:
- On the main screen, find the mod that is causing the crash. Select only that mod.
- Tap the "Merge Spine" button.
- The app will process the files. The originals will be backed up into a new
.oldsubfolder. - Re-install the newly merged mod. The crash should be resolved.
For users who want to extract original game files:
- Make sure no mods are selected on the main screen.
- Tap the floating unarchive (📤) icon.
- Select the
__datafile you want to unpack. - The extracted contents will be saved to the
Download/outputsfolder.
If you find this tool useful and want to support its development, please consider buying me a coffee ![]() . Every contribution is greatly appreciated!
. Every contribution is greatly appreciated!
-
Q: My mods aren't showing up!
- A: Double-check that you've selected the correct "Mod Source Folder" in the setup. Also, ensure your mods are in unzipped folders and follow the correct folder structure.
-
Q: The game crashes after installing a mod.
-
A: This is usually due to one of the following:
- Texture Count Mismatch: The mod's
.pngcount differs from the original (the app usually fixes this automatically). - Incorrect Filenames: All filenames must be lowercase (e.g.,
char000104.png). The image reference inside.atlasmust also be lowercase.
If the issue persists, try using the 'Merge Spine' feature manually. If it still fails, the mod itself might be corrupted or incompatible.
- Texture Count Mismatch: The mod's
-
-
**Q: The installation failed. What should I do?_
- A: Failures are usually caused by:
- Poor network connection (failed to download original files).
- Incorrect mod filenames.
- An unexpected repacking error. Check the error message in the dialog for clues.
- A: Failures are usually caused by:
-
Q: The in-game graphics are broken after installing a mod.
- A: This usually means the mod is incomplete or not compatible with the Android version. A complete character mod requires three files:
.png,.atlas, and either.skelor.json.
- A: This usually means the mod is incomplete or not compatible with the Android version. A complete character mod requires three files:
This tool was made possible by these incredible open-source projects:
- browndust2-repacker-android: For the core repacking and texture compression techniques.
- ReDustX: For the
.json-to-.skelconversion logic and CDN download methods. - UnityPy: For reading and modifying Unity game assets.
- astc-encoder: For the official ASTC texture encoder.
