This organization account is to host all softwares / tools / modules we develop for the BASF nematode project.
Unless mentioned, python stands for python3.
Use BBox-Label-Tool-large-img. For Windows users, you can download the "compiled" .exe in release.
This tool will produce a Labels folder containing all label txts with same relative paths as original bmp images. Now you should have Images and Labels folder with corresponding images and labels.
For details, follow the readme here
There will be multiple subfolders in both Images and Labels. Use the preprocess script to get all images under a single directory and rename them into NUMBER.jpg (convert to .jpg). The command is:
python preprocess_imgs_rcnn.py --old_img_folder Images --old_label_folder Labels --new_img_folder new_img --new_label_folder new_lbl --quality 95After this step, you will have two folders new_img and new_lbl.
Rotation and horizontal flip will give you 4x as many data. Illumination augmentation will give you 3x as many data. A combination gives you 12x as many data.
Use scripts here to do data augmentation. The command is:
python rotate_flip.py --img_folder new_img --label_folder new_lbl --aug_img_folder aug_img --aug_label_folder aug_lbl --quality 95
python illumination.py --img_folder aug_img --label_folder aug_lbl --aug_img_folder aug1_img --aug_label_folder aug1_lbl --quality 95
For consistency on folder names, in this demonstration, I renamed the folder names to new_*
rm -rf new_lbl
rm -rf new_img
rm -rf aug_img
rm -rf aug_lbl
mv aug1_img new_img
mv aug1_lbl new_lblUse the script here
The command is (you should specify N and V):
python voc_dataset_build.py --voc_folder VOC2007 --img_folder new_img --label_folder new_lbl --test_num N --val_num VIf you did data augmentation, the validation set is NOT TRUE (since validation data are seen during training). We set test_num (i.e. N) to 1 since we have seperate test data.
After this step, you should have folder VOC2007. Suppose the parent folder absolute path is X (i.e. you have path X/VOC2007)
You need a GPU and Python 2.7.
The data setup is:
git clone https://github.com/BASFProject-2018spring/faster-RCNN-gpu.git
cd faster-RCNN-gpu/data
ln -sf X VOCdevkit2007 (X is the path of the parent folder of VOC2007. i.e. you have X/VOC2007)
Next follow the instructions in this repo. We only kept training scripts from original Faster-RCNN implementation in this repository.
You need Python 2.7
You will see run.py under tools folder in faster-RCNN-gpu repo.
Get the model from output folder and put it to $HOME/models, rename the model to either res152.pth, res101.pth or vgg16.pth according to which model you were training.
put all your test images under $HOME/imgwork/input and run command:
python run.py --net NET(NET can be either vgg16, res101 or res152)
In $HOME/imgwork/output, you will see all annotated images and the detailed boxes as txt files (box coordinates, classifications and confidences). If you can code, you may want to process those txt files by your own (very simple). Or you may try our GUI (details later)...
You need Python 2.7
Use this repo instead. You'll see tools/run.py as well but it uses CPU.
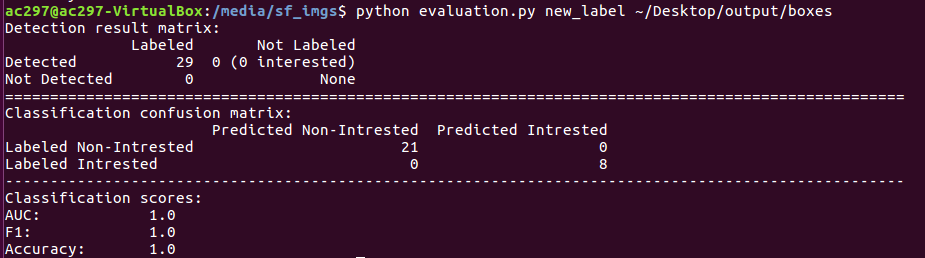
You can use evaluation.py in this repo to generate confusion matrix for prediction quality. This script is written in Python 3. Suppose your prediction boxes folder is Pred and you have ground truth boxes Label (labeled using bbox-tool), simply run command in terminal:
python evaluation.py Label PredIn the termial, you will see confusion matrix for both detection and classification, also AUC, F1 and accuracy statistics.
If you have test images not with the same scale as the training images (higher magnification), before feeding them to the network for prediction, you should rescale the images to the same scale. Note: in this case, our network will have worse performance.
We wrote a script for such rescalling. Suppose you put all images in the old_img folder and want the rescaled images to be in the new_img folder, with rescale factor 0.5 (note: only scalling down (making image smaller) supported, i.e. factor <1.0). You should download the script and run:
python image_rescale.py --input old_img --output new_img --scale 0.5This is just for the convenience of clients so they don't need to write additional code to process the inference txts. Documents are here.
If you want the model working for more than 2 classes, edit the following part of our code:
- Labeling tool: Add classes in class.txt.
- VOC builder and preprocessing: No change required.
- Model: In both CPU and GPU versions, add classes in pascal_voc.py
- Inference: In both CPU and GPU versions, add classes in run.py and add color encodings for new classes.
- Evaluation: Confusion matrix generator evaluation.py needs to be re-written.
Unless mentioned, all modules for this project are under GNU GPL v3 license.