IntelliJ setup
IntelliJ comes in two versions:
- Community Edition: Free to download and sufficient for this project (it is not a trial version that expires).
- Ultimate Edition: Paid version that has support for various frameworks (which we don't need).
You can find versions for Windows, Linux, and macOS on the official website.
No additional plugins are required for this project.
- start IntelliJ

- select Do not import settings
- click OK

- select Theme
- click Skip Remaining and Set Defaults

- select Check out from Version Control
- select Git

-
enter your repository/branch details
-
click Test
-
click Clone
-
-- wait ---
You will receive a prompt indicating that your checkout from version control contained a project file. In my experience, attempting to open this file fails to do anything useful.

- click No

- click Open

Browse to the folder you specified for the parent and inside the folder you specified for the git checkout. You should see a pom.xml file.
- select the pom.xml file
- click OK

- select Open as Project
At this point IntelliJ should be open with the Forge project. However, it will take a while for IntelliJ to download all the project dependencies. This is reflected in the bottom status bar by default.
- select File
- select Project Structure...

- select New
- select JDK


If necessary browse to the JDK directory.
- click OK

-
click OK
-
select Run from the top menu
-
select Debug... from the drop down

-
select Edit Configurations...
-
click the + in the upper left

- select "Application"
-
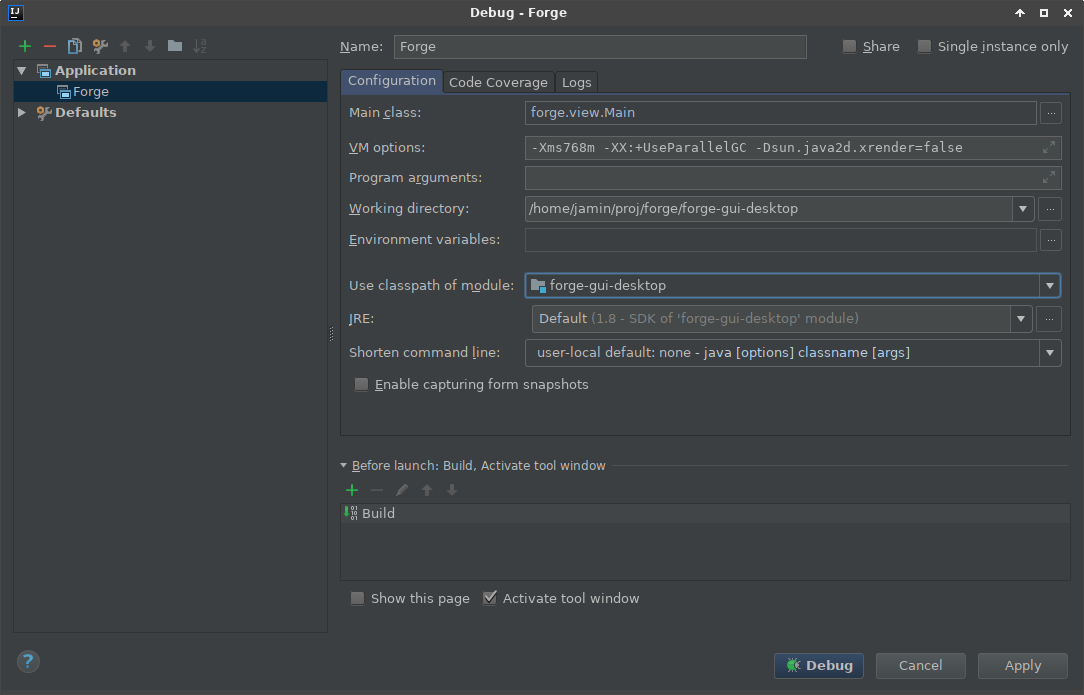
set the Name to: Forge
-
set the Main class to: forge.view.Main
-
Latest IntelliJ Versions: click Modify options and check Add VM Options
-
set the VM options to:
-
(JAVA 17 and above)
-Xms768m -XX:+UseParallelGC -Dsun.java2d.xrender=false --add-opens java.base/java.util=ALL-UNNAMED --add-opens java.base/java.lang=ALL-UNNAMED --add-opens java.base/java.lang.reflect=ALL-UNNAMED --add-opens java.base/java.text=ALL-UNNAMED --add-opens java.desktop/java.awt.font=ALL-UNNAMED --add-opens java.base/jdk.internal.misc=ALL-UNNAMED --add-opens java.base/sun.nio.ch=ALL-UNNAMED --add-opens java.base/java.nio=ALL-UNNAMED --add-opens java.base/java.math=ALL-UNNAMED --add-opens java.base/java.util.concurrent=ALL-UNNAMED --add-opens java.desktop/java.awt=ALL-UNNAMED --add-opens java.base/java.net=ALL-UNNAMED --add-opens java.desktop/javax.swing=ALL-UNNAMED --add-opens java.desktop/java.beans=ALL-UNNAMED --add-opens java.desktop/javax.swing.border=ALL-UNNAMED -Dio.netty.tryReflectionSetAccessible=true
-
(JAVA 17 and above)
-
set the Working directory to %MODULE_WORKING_DIR%
-
set Use classpath of module to: forge-gui-desktop
-
click Debug
-
-- wait --
If all goes well, you should eventually see the Forge splash screen followed by the main UI.
Follow the same steps to create a Run Configuration, but use forge-gui-mobile-dev as the module and forge.app.Main for the main class.
When you have no initial lead a good idea is setting a breakpoint at AbilityUtils.resolve. From there you can step towards the individual effects (unless something is seriously broken):

Another approach if you can't quickly find any obvious errors in the code:
- compare scripts with the same effect variants (ideally newer ones)
- use
git blameto check if the script was recently updated - sometimes the cause is from a typo introduced