A Flutter Project for guiding 30 widgets
This project is a starting point for a Flutter application.
A few resources to get you started if this is your first Flutter project:
Lab: Write your first Flutter app
Cookbook: Useful Flutter samples
For help getting started with Flutter, view our online documentation, which offers tutorials, samples, guidance on mobile development, and a full API reference.
Install Flutter with cmd
I think you all finally install Flutter sdk tools and Android Studio
So lets start installing flutter and create our first project namely "my_first_app"
lets get started -
flutter doctor
Doctor summary (to see all details, run flutter doctor -v):
[√] Flutter (Channel stable, 3.24.3, on Microsoft Windows [Version 10.0.26100.2033], locale en-IN)
[√] Windows Version (Installed version of Windows is version 10 or higher)
[√] Android toolchain - develop for Android devices (Android SDK version 35.0.0)
[√] Chrome - develop for the web
[X] Visual Studio - develop Windows apps
    X Visual Studio not installed; this is necessary to develop Windows apps.
      Download at https://visualstudio.microsoft.com/downloads/.
      Please install the "Desktop development with C++" workload, including all of its default components
[√] Android Studio (version 2024.2)
[√] Connected device (4 available)
[√] Network resources

! Doctor found issues in 1 category.To Create an app using cmd,follow these steps:-
- Create an Empty folder and rename it as "flutter projects"
- right click on empty folder and click on "open in terminal"

- open terminal
- write "flutter create my_first_app" in terminal and press enter
flutter create my_first_appflutter create my_first_app
Creating project my_first_app...
Resolving dependencies in `my_first_app`... (1.3s)
Downloading packages...
Got dependencies in `my_first_app`.
Wrote 129 files.
All done!
You can find general documentation for Flutter at: https://docs.flutter.dev/
Detailed API documentation is available at: https://api.flutter.dev/
If you prefer video documentation, consider: https://www.youtube.com/c/flutterdev
In order to run your application, type:
$ cd my_first_app
$ flutter run
Your application code is in my_first_app\lib\main.dart.- YOUR FLUTTER application IS READY
It does not contain colour attributes
body:Center(
        child: SizedBox(
          height: 650,
          width: 650,
          child: Center(child: Text('This is sized Box ')),
        ),
) ,It contain Multiple Paramaters such as color,child,height,width,decorations,etc
body: Center(
        child: Container(
          height: 250,
          width: 250,
          decoration: BoxDecoration(
            color: Colors.blue,
            shape: BoxShape.circle,
          ),
          child: Center(child: Text('This is Container',style: TextStyle(fontSize: 30),)),
          // child: Center(child: Text('This is Container',style: TextStyle(
          //   fontSize: 30,
          //   color: Colors.yellowAccent,
          // ),)),
          // color: Colors.blue,
        ),
),@override
Widget build(BuildContext context) {
//defining two media quaries for width and height of the mobile
var w=MediaQuery.of(context).size.width;
var h=MediaQuery.of(context).size.height;this should be written inside @override----context functions
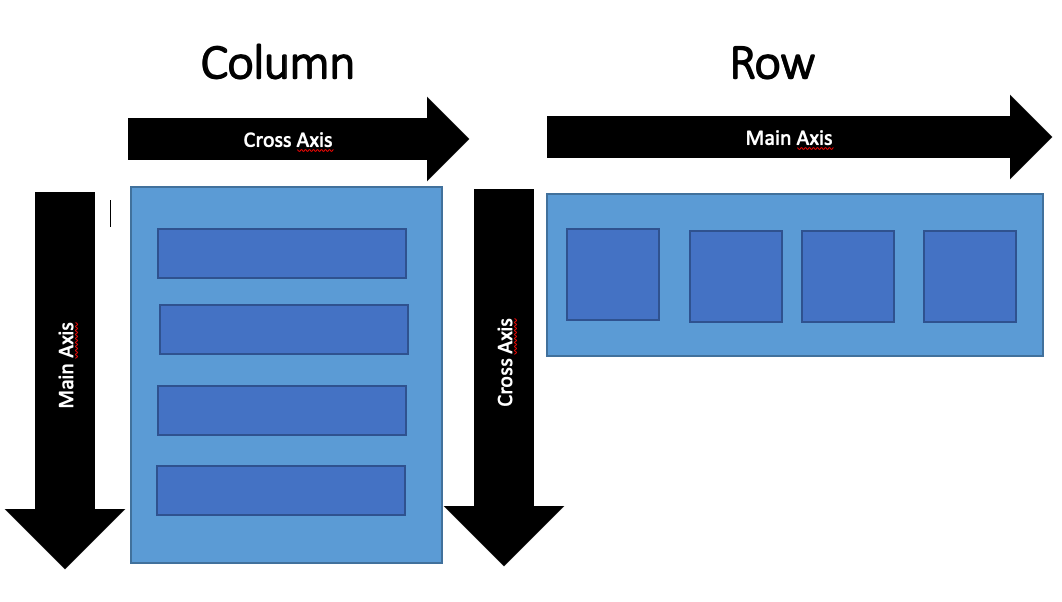
body: Container(
        height: h,
        width: w,
        color: Colors.yellowAccent,
        child: Row(
          // mainAxisAlignment: MainAxisAlignment.center,  //Centering every Containers in a Row
          mainAxisAlignment: MainAxisAlignment.spaceEvenly, //GIVING SPACES BETWEEN EACH CONTAINER WITH MARGINS
          crossAxisAlignment: CrossAxisAlignment.stretch, //stretching each container with mobile height and width
          children: [
            //Container 1
            Container(
              height: 60,
              width: 60,
              color: Colors.red,
            ),
            //Container 2
            Container(
              height: 60,
              width: 60,
              color: Colors.blue,
            ),
            //Container 3
            Container(
              height: 60,
              width: 60,
              color: Colors.green,
            ),
            //Container 4
            Container(
              height: 60,
              width: 60,
              color: Colors.black,
            ),
            //Container 5
            Container(
              height: 60,
              width: 60,
              color: Colors.pinkAccent,
            ),
            //Container 6
            Container(
              height: 60,
              width: 60,
              color: Colors.grey,
            ),
          ],
        ),
),body: Container(
height: h,
width: w,
color: Colors.pinkAccent,
child: Column(
mainAxisAlignment: MainAxisAlignment.spaceEvenly,
crossAxisAlignment: CrossAxisAlignment.stretch,
children: [
//Container 1 of coloumn widgets
Container(
height: 60,
width: 60,
color: Colors.purpleAccent,
),
//Container 2 of column widgets
Container(
height: 60,
width: 60,
color: Colors.blue,
),
//container 3 of coloumn widgets
Container(
height: 60,
width: 60,
color: Colors.yellowAccent,
),
//Container 4 of column widgets
Container(
height: 60,
width: 60,
color: Colors.orangeAccent,
)
],
),
),Here in this section we will explore two different types of buttons that we have in our buttons widgets line by line.
lets get started:-
 body: Column(
        mainAxisAlignment: MainAxisAlignment.center,
        children: [
          Center(

            // TextButtons

            child: TextButton(
              onPressed: (){
                print("TextButton"); //printing the output in the console
              },
              child: Text("Press Me",style: TextStyle(
                fontSize: 25,
                color: Colors.black
              ),),
              style: ButtonStyle(
                // padding: WidgetStatePropertyAll(EdgeInsets.all(50)),
                overlayColor: WidgetStatePropertyAll(Colors.red),
                backgroundColor: WidgetStatePropertyAll(Colors.yellow)
              ),
            ),
          ),
 //Elevated Buttons

          Container(
            // height: 70,
            // width: 200,
            child: ElevatedButton(
              style: ButtonStyle(
                backgroundColor: WidgetStatePropertyAll(Colors.red),
                overlayColor: WidgetStatePropertyAll(Colors.blue),
              ),
              onPressed: (){
                print("Elevated Button"); //printing the output in console
              },
              child: Text("Elevated Buttons",style: TextStyle(
                fontSize: 25,
                color: Colors.yellow,

              ),),
            ),
)//creating a function for a listView when we dont know the exact length of a cards to be drawn
List<String> fruits=["Oranges","Mangoes","Apples","banana"];
Map fruits_person={
"fruits":["Oranges","Mangoes","Apples","banana"],
"names": ["Devansh","Subhansh","Shivansh","asif"]
};P.S :- this should be written under the statefull widget between the "context functions" and "override"
body: Container(
        child: ListView.builder(
          itemCount: fruits.length,
          itemBuilder: (context, index) {
            return Card(
              child: ListTile(
                onTap: (){
                  print(fruits_person["fruits"][index]);
                  print(fruits_person["names"][index]);
                },
                leading: Icon(Icons.person),
                title: Text(fruits_person["fruits"][index]),
                subtitle: Text(fruits_person["names"][index]),
              ),
            );
          },
        ),
),- SizedBox Widget
- Container Widgets
- Rows Widget
- Column Widget
- TextButton and ElevatedButton Widget
- ListView Widgets


For support, email devanshsadhya77@gmail.com or join our discord channel.
What did you learn while building this project? What challenges did you face and how did you overcome them?