This repository contains a simulation of a 3 Degrees of Freedom (DOF) robotic arm controller. The project aims to simulate a controller for a 3 DOF robot, enabling it to reach a specified setpoint by controlling its joint velocities through Jacobian matrices.
This simulation project uses the Robotics Toolbox for Python to modeland control a 3 DOF robot. The main functionalities include:
-
Visualized the robot's with 3D model in RVIZ2.
-
Generating a 3 DOF robot model using the xacro urdf file.
-
Controlling the robot's via custom teleop keyboard inside the packages.
-
Controlling the robot's end-effector by computing joint velocities using the Jacobian.
-
Random target generation for the end-effector through a ROS2 client-server model.
-
Custom target setpoint for the end-effectorthrough a ROS2 client-server model.
-
Integration of ROS2 nodes for real-time robot control and simulation.
The repository includes the necessary code for setting up the robot, controlling it, and visualizing its movements in a simulation environment.
-
Jacobian-based Velocity Control: The controller uses the Jacobian matrix to compute the necessary joint velocities to achieve a target (x, y, z) in the workspace.
-
Custom Teleoperation Keyboard: Controlled your robot with only 1 keyboard.
-
ROS2 Integration: A ROS2 client-server communication is established to generate random targets and update the robot's setpoint accordingly.
-
RVIZ Model Visualized: Fast and easy visualizer with adjustable models.
To run this project, ensure you have the following installed:
- ROS2 Humble (or your preferred ROS2 distribution)
- Colcon build system
- Python 3.8+
- Robotics Toolbox for Python
This project need a python 3.8+ environment and Robotics Toolbox for Python library.
-
Make sure your environment use python 3.8+ by using this command.
python3 -V
-
Install & upgrade python3-pip.
sudo apt-get install python3-pip
python3 -m pip install --upgrade pip
pip3 install -U pip
Make sure pip is installed using
pip3 -V -
Install
Robotics Toolbox for Pythonusing pip3. Tutorial from Robotics Toolbox GitHub.pip3 install roboticstoolbox-python
After finished install make sure you installed roboticstoolbox-python successfully using
pip3 show roboticstoolbox-python
For use
Robotics Toolbox for Pythonhave to use numpy < 1.25.0pip3 install numpy==1.24.4
Make sure you using numpy < 1.25.0 by
pip3 show numpy
Check that roboticstoolbox-python can use with python environment.
teety@TeeTy-Ubuntu:~$ python3
Python 3.10.12 (main, Sep 11 2024, 15:47:36) [GCC 11.4.0] on linux
Type "help", "copyright", "credits" or "license" for more information.
>>> import numpy as np
>>> np.__version__
'1.24.4'
>>> import spatialmath as stm
>>> stm.__version__
'1.1.11'
>>> import roboticstoolbox as rtb
>>> rtb.__version__
'1.1.0'
>>> print(rtb.models.Panda())
ERobot: panda (by Franka Emika), 7 joints (RRRRRRR), 1 gripper, geometry, collision
|   link   |     link     |   joint   |    parent   |              ETS: parent to link               |
|:--------:|:------------:|:---------:|:-----------:|:----------------------------------------------:|
|     0    |  panda_link0 |           |     BASE    | SE3()                                          |
|     1    |  panda_link1 |     0     | panda_link0 | SE3(0, 0, 0.333) ⊕ Rz(q0)                      |
|     2    |  panda_link2 |     1     | panda_link1 | SE3(-90°, -0°, 0°) ⊕ Rz(q1)                    |
|     3    |  panda_link3 |     2     | panda_link2 | SE3(0, -0.316, 0; 90°, -0°, 0°) ⊕ Rz(q2)       |
|     4    |  panda_link4 |     3     | panda_link3 | SE3(0.0825, 0, 0; 90°, -0°, 0°) ⊕ Rz(q3)       |
|     5    |  panda_link5 |     4     | panda_link4 | SE3(-0.0825, 0.384, 0; -90°, -0°, 0°) ⊕ Rz(q4) |
|     6    |  panda_link6 |     5     | panda_link5 | SE3(90°, -0°, 0°) ⊕ Rz(q5)                     |
|     7    |  panda_link7 |     6     | panda_link6 | SE3(0.088, 0, 0; 90°, -0°, 0°) ⊕ Rz(q6)        |
|     8    | @panda_link8 |           | panda_link7 | SE3(0, 0, 0.107)                               |
>>>
[2]+  Stopped                 python3
If you see a table, so now your roboticstoolbox-python library is ready now.
-
Make sure your environment have ROS2 Humble (or your preferred ROS2 distribution)
printenv | grep -i ROSROS_VERSION=2 ROS_PYTHON_VERSION=3 . . . ROS_DISTRO=humble
if you see humble or other ROS2 Distributions maens your ROS2 is ready now.
-
Install
RVIZ2TF2androbot_state_publisher packagein your ROS2 Environment. With installros-desktop-fullsudo apt install ros-{ROS_DISTRO}-desktop-fullreplace {ROS_DISTRO} with your ros2 distributions. Example
sudo apt install ros-humble-desktop-full
-
Source your environment.
source /opt/ros/humble/setup.bash
echo "source /opt/ros/humble/setup.bash" >> ~/.bashrc
source ~/.bashrc
-
Check a require
packagesin ROS2.ros2 pkg executables rviz2 ros2 pkg executables tf2_ros ros2 pkg executables robot_state_publisher
rviz2 rviz2
tf2_ros buffer_server
tf2_ros static_transform_publisher
tf2_ros tf2_echo
tf2_ros tf2_monitor
robot_state_publisher robot_state_publisher
-
Check a require
interfacesin ROS2ros2 interface package sensor_msgs
sensor_msgs/msg/CameraInfo
sensor_msgs/msg/Illuminance
sensor_msgs/msg/NavSatStatus
sensor_msgs/msg/PointCloud
sensor_msgs/msg/LaserEcho
sensor_msgs/msg/FluidPressure
sensor_msgs/msg/BatteryState
sensor_msgs/msg/Range
sensor_msgs/msg/JoyFeedbackArray
sensor_msgs/msg/Joy
sensor_msgs/srv/SetCameraInfo
sensor_msgs/msg/ChannelFloat32
sensor_msgs/msg/NavSatFix
sensor_msgs/msg/Temperature
sensor_msgs/msg/Imu
sensor_msgs/msg/RelativeHumidity
sensor_msgs/msg/LaserScan
sensor_msgs/msg/MultiDOFJointState
sensor_msgs/msg/MultiEchoLaserScan
sensor_msgs/msg/MagneticField
sensor_msgs/msg/PointCloud2
sensor_msgs/msg/CompressedImage
sensor_msgs/msg/JoyFeedback
sensor_msgs/msg/TimeReference
sensor_msgs/msg/RegionOfInterest
sensor_msgs/msg/JointState
sensor_msgs/msg/Image
sensor_msgs/msg/PointField
Check that you have all package above for next step.
- Go to ~
PATHand clone this repository:cd ~ git clone https://github.com/TeeTyJunGz/FUN4.git
- Navigate to the project directory:
cd FUN4 - Build and source the workspace:
You should finished build with 2 packages.
colcon build && source install/setup.bash
Starting >>> robotic_interfaces
Starting >>> robotics_model_3dof
Finished <<< robotics_model_3dof [0.42s]
Finished <<< robotic_interfaces [0.71s]

Summary: 2 packages finished [0.89s]
- Add source to
~/.bashrc:echo "source ~/FUN4/install/setup.bash" >> ~/.bashrc
- Source
~/.bashrc:source ~/.bashrc
- Check ROS2 packages:
This is all
ros2 pkg executables robotics_model_3dof
packagesfrom this project.robotics_model_3dof TF_Check.py robotics_model_3dof cpp_node_test robotics_model_3dof kinematics.py robotics_model_3dof robot_controller.py robotics_model_3dof robot_scheduler.py robotics_model_3dof target_randomizer.py robotics_model_3dof teleop_keyboard.py
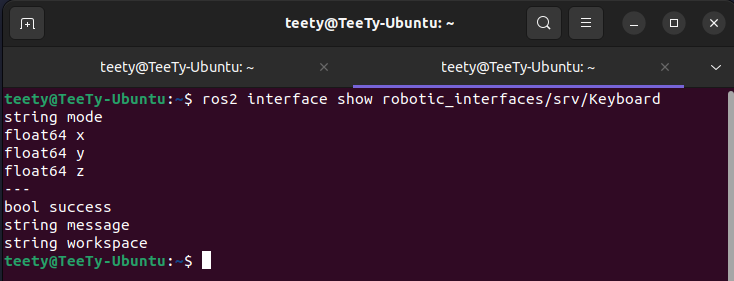
- Check ROS2 interfaces:
This is all
ros2 interface package robotic_interfaces
interfacesfrom this project.robotic_interfaces/srv/Keyboard robotic_interfaces/srv/RandomTarget robotic_interfaces/srv/StateScheduler
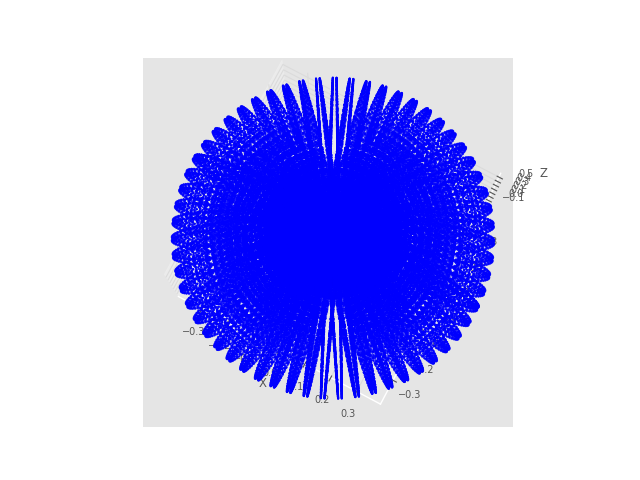
This workspace generated from find limit of q1 q2 q3 and sample all possible data that q1 q2 q3 can go to that position, last plot all position to a graph.
You can launch the project using the provided ROS2 launch file. The launch file is visualized a 3DOF robot in rviz2, that you can control later.
ros2 launch robotics_model_3dof robot.control.launch.py If you need to adjust Kp for speed . Change 5.0 to your custom Kp
ros2 launch robotics_model_3dof robot.control.launch.py Kinematics_Kp:=5.0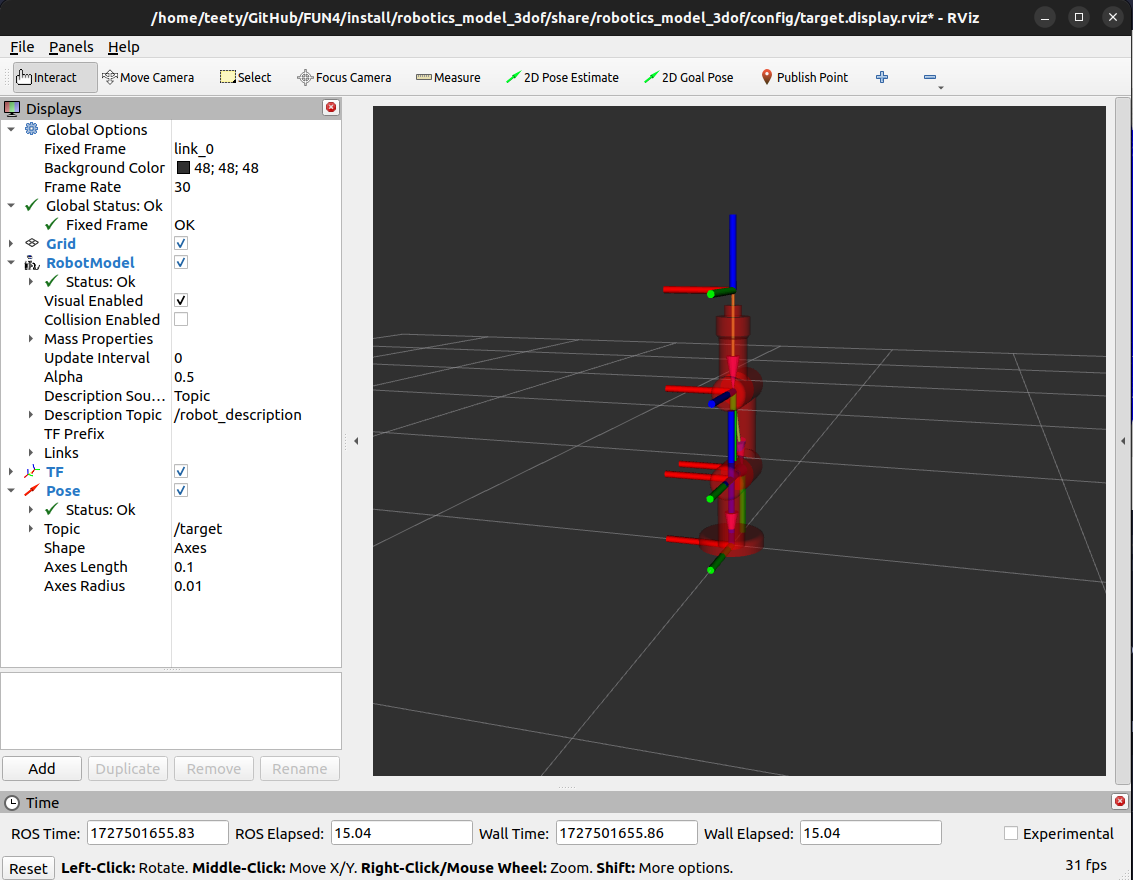
You can random a visualized target Pose in this rviz2 with a service via terminal
ros2 service call /rand_target robotic_interfaces/srv/RandomTarget "data: true" -
data= trueTarget will random spawned somewhere in the robot workspace, and this service will
responsea position that random too. -
data= falseTarget won't spawn if you request
Falseand this service will do nothing.
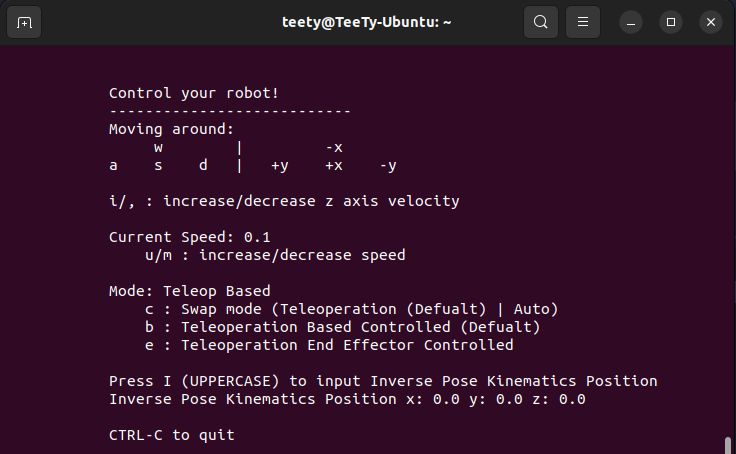
You can visualized an End Effector with controller mode too, with these command.
Open a new terminal
ros2 run robotics_model_3dof teleop_keyboard.py If your teleop_keyboard open correctly at launch file terminal will show Tele-operation Mode
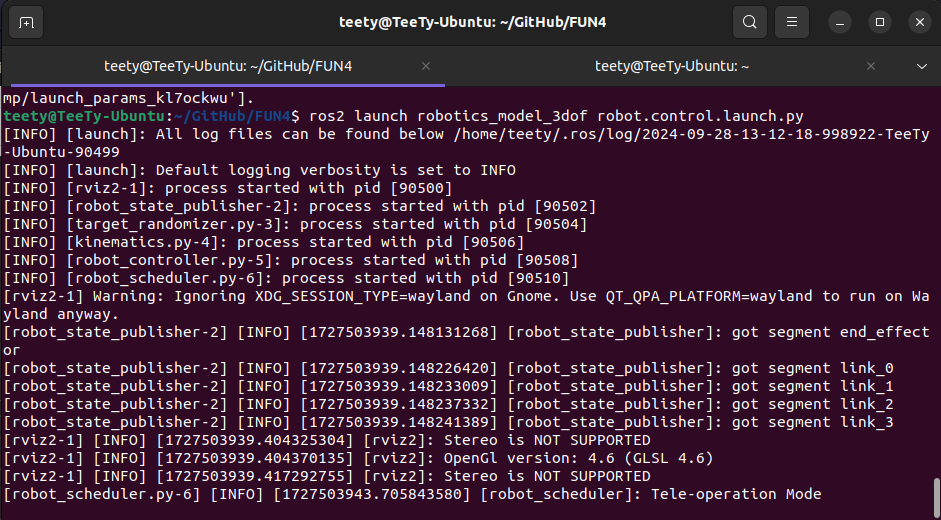
Now at rviz2 an End Effector Pose will appeared
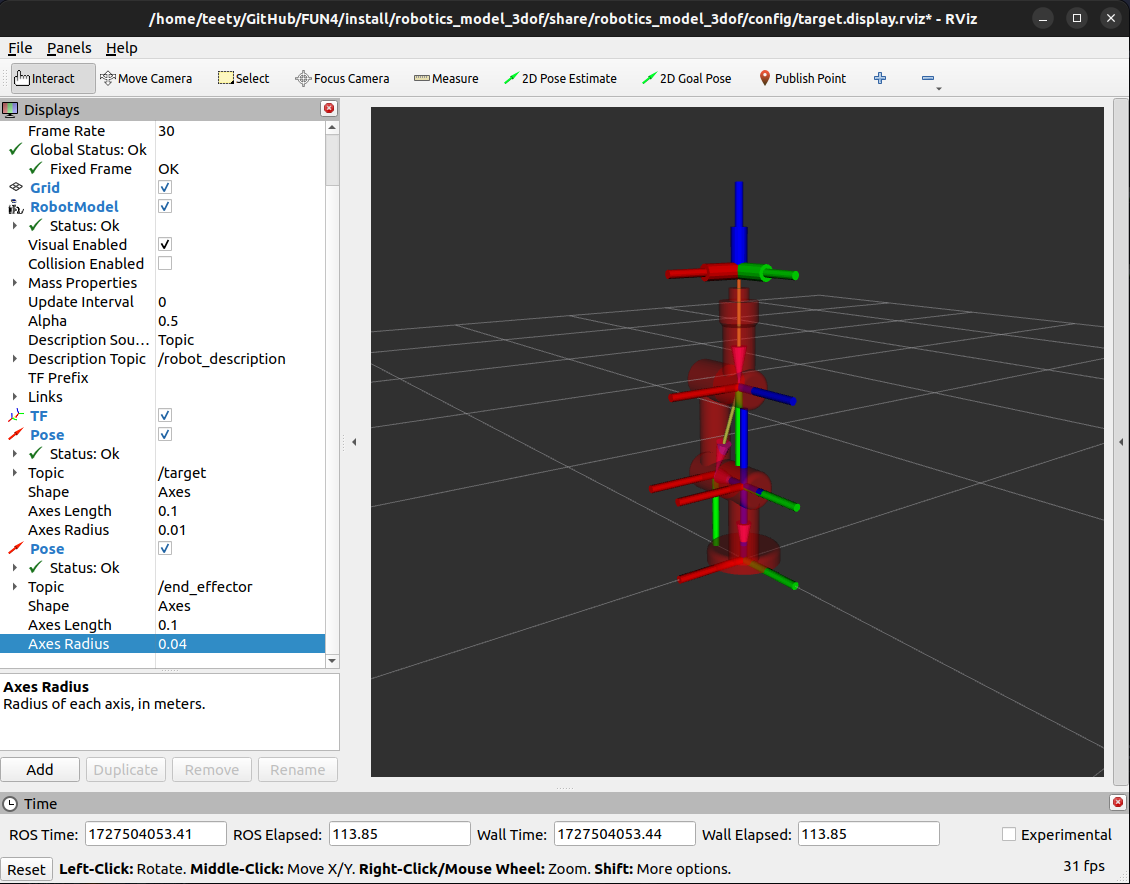
You can controlled robot using Cutom Service Interface or Teleop Keyboard
-
Custom Service InterfacesRequest
-
string mode: Mode selector [ IPK, Teleop Based, Teleop End Effector, Auto ] -
float64 x, y, z: Given position setpoint for IPK mode
Response
-
bool success: ResponsedTruewhen can change mode andFalsewhen cannot change -
string message: Responsed a message I tell requester about mode changes -
string workspace: Responsed only when use IPK mode and float64 x, y, z is out workspace
-
-
Teleop KeyboardTeleop Keyboard is just a Custom Service Interfaces with GUI, you can change mode same as Custom Service Interfaces. Input for IPK mode can also done within this keyboard
-
IPK (Inverse Pose Kinematics Mode)
This mode will wait for user input to controlled a robot, user must input 3 positions for x, y, z. When this mode get a position, it wiil calculated for response 2 things .
-
successresponseTruewhen target is in workspace,Falsewhen target out a workspace. -
workspaceresponse when q1 q2 q3 can go to target.
-
-
Teleop Based, Teleop End Effector
This mode must control via Teleop Keyboard only. This mode will controlled a robot using velocity for each axis (x, y, z). There're 2 type.
-
BasedAll velocity that this node craete will refferance fromBase. -
End EffectorAll velocity that this node craete will refferance fromEnd Effector.
-
-
Autonomouse
This node will call a service name
rand_targetthat will random a target within workspace of robot and response target tokinematicsNode and send q1, q2, q3 to robot.