A fast and cheap project to make a 1U rack filler with a WOPR-inspired blinking lights effect. Now your favourite psychopathic supercomputer can live with you every day!

A video of it running on the bench
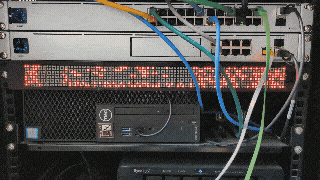
More complex options available via RasPi
- Dot matrix LED Module - These are super basic 8x8 modules sometimes referred to as MAX7219 modules. You can buy them on single control boards or you can buy them in pre-made racks of 4 modules. I used these ones from Amazon UK in packs of 2 - https://www.amazon.co.uk/dp/B07YWRZ3FC but you can also find them on Amazon US like this https://www.amazon.com/dp/B07FFV537V - either way it's about £6/$8 for each rack of 4. You'll find that 3 in a row fits in 1U rack just right. They link together in series and can easily be soldered one to another to make a single rack of 96x8 LEDs.
- Arduino Uno - primary controller for the code and signalling. You only need a very basic single microcontroller board and other boards like a RasPi Pico (different code needed, but has options for more complex coding using python) or a Arduino Nano will work just fine. No need for any networking, wifi etc etc, just the most basic IO board. About £10/$12 here.
- A rack mount or case - I used this 3D print model https://www.printables.com/model/1231389-1u-wopr made by printables user @Seth_215443
- (Optional) - Cheap case You could instead take a cheap 1U metal rack blank (<£5) and either fix to the front with hot glue, or add perspex etc around the outside. Something like this: https://www.amazon.co.uk/dp/B01MFA1QBK
- (Optional) - Desktop Case Don't have a rack? Printables user @VonIII_1710368 has designed a desktop version which can be 3d printed https://www.printables.com/model/1238997-wopr-leds-enclosure-desktop-version
- Connext 8x8 modules together These modules can be daisy chained and each rack of 4 has clearly marked 'in' and 'out' connections. The ones I suggest above come with pre-soldered headers on the 'in' side only which can easily be inserted and bent into the 'out' side for a nice easy, stable soldered connection. Link 3 of the x4 modules together and you've got a rack of 12 modules for a total of 8x96 LEDs.
- Wire the Arduino in either solder into the IO through holes or add header pins and use wired connectors, connect the Arduino to the 'in' side of the rack. The code here uses 5V, GND, CS to pin 3, DIN to pin 11 and CLK to pin 13 (caution - RasPi uses different pins - see below)
- Install in a casse/rack some 3D print case options are here in this repository, or use the links to the printables where they can be found and looked at in more detail
- For Arduino Connect the Arduino Uno/Pico to the Arduino IDE, create and upload the code file wopr.ino from this repository, and you should be done! You can play with the settings in the wopr.ino file to adjust speed or transitions, how many columns change each time and roughly what percentage of lights in a column are lit at any one time (probability based obviously so fairly variable but usually about right over the 768 LEDs on display.
- For RasPi download and install the micropython firmware to your Pi, add the MAX7219.py file and use the boot.py file, upload to the RasPi and connect to the pins specified in the file (2, 3, 5), and that should be it. Similar control over probability and speed are found in this file by changing the numbers of the random options a bit
- For RasPi more complexity same as above but use 'main.py' instead of 'boot.py' and this will change your display to use a variety of pretty patterns including the game of life and some which march back and forth, a bit closer to WOPR in the film itself.
Credit and thanks to the following people who made this before me:
u/aforsberg who made v1 of this project . The main changes here are about the code being in Arduino format and having added a lot of flexibility - my code lets you change speed, percentage of LEDs lit, percentage of rows changing each time etc. His project can be seen here: https://www.reddit.com/r/homelab/comments/1iboomc/i_spent_a_few_days_designing_a_1u_bar_of_leds/
harddal @ github who initially provided arduino code conversion: https://github.com/harddal/WOPR-LED/tree/main
printables user @Seth_215443 who made a 1U rack mount 3d print as well as more complex python coding options for the RasPi here: https://github.com/sethvoltz/1u-wopr