
This is the exam project submission for the Software Development Methods AY 2020/21 course, offered by University of Trieste, Italy.
It consists in an implementation of the original board game "Take it Easy" by Peter Burley for sole educational purposes, no copyright infringement is intended.
The authors of this project are Alberto Luvisutto, Nicolas Plasencia, Michele Rispoli and Azad Sadr.
Download the repository, then navigate to the folder and execute gradlew.bat runTie (or gradlew runTie on Linux) to launch the game.
The game consists in placing hexagonal tiles on a board with 19 hexagonal slots.
Each tile displays three values, one on the top (1,5 or 9), one on the bottom-left (2,6 or 7) and one on the bottom-right (3,4 and 8), and there are 27 possible tiles, corresponding to all the possible combinations of these values.
Each player has its own board and, at each turn, all the players place the same randomly picked tile on their board.
Any of the 27 possible tiles may only appear once in a game and cannot be repositioned once placed.
When all the players have placed the current tile, a new one is randomly picked, and the process repeats until all the players have filled their board.
Points are scored by aligning tiles presenting the same value in the spot corresponding to the line orientation (i.e. vertical, diagonal bottom-left, diagonal bottom-right): when all the tiles in a line present the same number, that line is worth the common number times the number of tiles comprising the line. If any two numbers along the line differ, the line is worth 0 points.
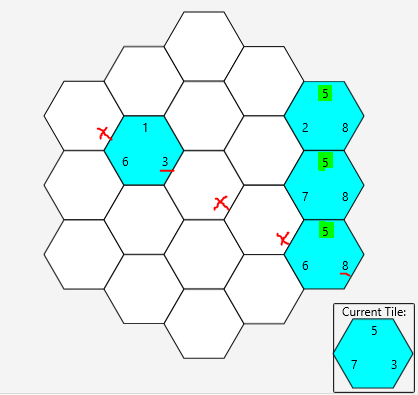
As an example, consider the following board:
The three tiles on the right form a vertical line of 5s (highlighted in yellow) that is worth 5*3=15 points.
On the contrary, the central bottom-right diagonal line will be worth no points because there are two tiles in it presenting different values in the bottom-right spot (underlined in red); this also means that you can stop worrying about what you put in the remaining bottom-right spots along that line (the red Xs).
The game ends when all the players have placed the last tile, and the player who scored most points across all the lines wins.
To start a new match navigate to the local lobby from the main menu.
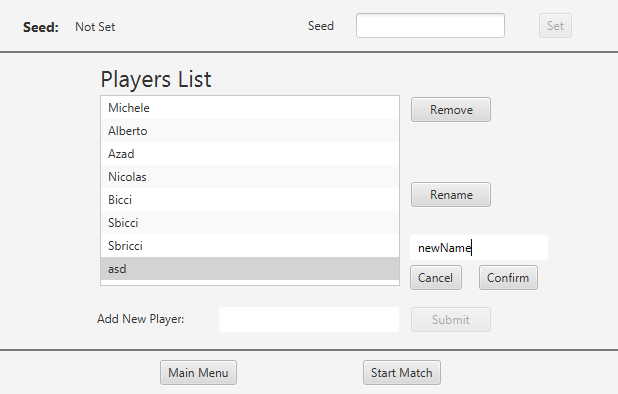
In this screen you can set up the match by adding any number of players. You may rename or remove players, and you may also customize the game seed to challenge a friend on the same tile set or replay a game to improve your score. Notice that, if not explicitly set, a new random seed is picked at each new match.
Once you're done setting up the match, click on "Start Match" to start playing
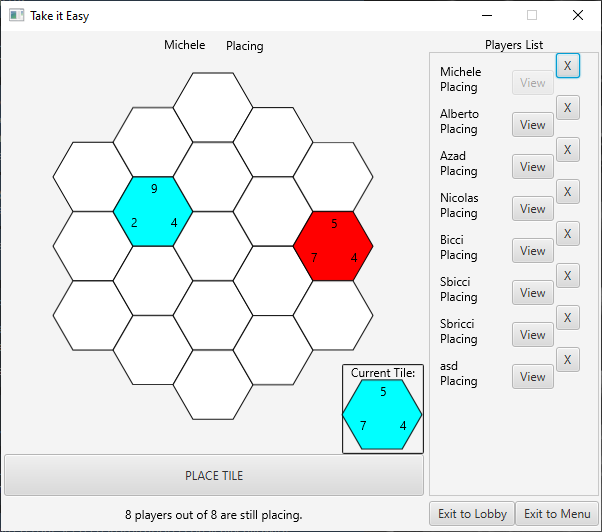
The in game screen shows the current player's board: click on any empty position and then on "PLACE TILE" to make your move. Once the current tile is placed you cannot reposition it, so choose carefully!
At any point you may look at any player's board by clicking on the "View" button next to their name in the list on the right.
You may also remove a player from the game by clicking on the "X" near their name and then "Confirm" on the prompt that appears (although you cannot kick the last player in the match).
You may also interrupt the current game by going back to the lobby or to the main menu using the buttons in the bottom right of the window (NOTE: a new random seed will be picked!).
When all the players have placed the last tile the game ends displaying all players' scores and stating the winner(s) in the bottom of the window. Two new buttons appear to allow to quickly start a new match against the same players, either using the same seed (i.e. replay with the same tile sequence) or picking a new random one.
The project was developed using IntelliJ IDEA Community Edition, leveraging gradle for setting up the build.
The work was carried on Windows, Mac and Linux machines using git/GitHub to allow parallel collaborative implementation whenever possible (see this repo's history for all the details).
The core engine of the game was developed using a test-driven approach (which also comprised setting up Travis for automated testing at each build).
The graphical interface, implemented in JavaFX, was developed with the aid of the SceneBuilder and tested manually.
Furthermore, throughout the whole project we attempted to disregard cycles in favour of a functional programming approach through the use of Java Streams wherever possible.
The project architecture was designed through brainstorming sessions that involved the whole team, and most of the implementation was carried on through pair-programming (constantly switching roles and members of each pair, to maximize experience :) ).
The project was written in Java 15.
It also uses junit for testing and the javafx and json.
Check the build.gradle file for updated information on the packages version.
The codebase is organized in packages:
takeiteasy.corecontains the core game engine that runs the game logictakeiteasy.GUIcontains the javafx GUI implementation, which uses theIGameinterface to control the game and retrieves its state (as a JSON file), acting as client. We strove to keep the game and GUI logic separated.unittestscontains all the tests pertaining the core game enginetakeiteasy.utilitycontains a single utility class that provides facilities to generate the standard set of hexagonal coordinates.
The JSON interface is detailed in the takeiteasy.core.JSONKeys class and acts as a reference for any GUI implementation that may be used to interface with the core engine.
The application entrypoint is defined in the takeiteasy.Main class, which simply launches the takeiteasy.GUI.FXApplication.
Here's a brief overview of the main packages:
HexCoordinates
Class representing a set of three hexagonal coordinates, used to map tiles to positions on each player's board. This website offered precious insights during the design of this class.IBoard
Public interface of the generic game board, that grants the fulfillment of the Open-Closed SOLID principle (there are several variations of the classic Take It Easy rules that require different boards)BoardVanilla
Class implementing the board for playing a 'classic' Take It Easy game. Features methods for placing and retrieving tiles and for computing the score.
IGame
Public interface of the core game class, providing all the methods that the GUI has access to. This includes setting up a match and playing it. All the methods returnvoidand throw no exceptions: the game will only perform actions when it can (i.e. exceptions are managed internally), and the internal state can be only obtained in form of a JSON object through thegetData()method.Game
Class actually implementing the game mechanics. ExceptgetData(), which always returns a valid JSON object representing the internal game state, the other methods are effective only when called in the rightGame.State. In other words, this class implements a state-machine with the following three states:MAIN_MENUcreateLocalLobby(): transitions toLOCAL_LOBBYstate and creates a newgameMatchfor local hot-seat.
LOCAL_LOBBYDuring this state one can set up the match for local play and either start it or go back to main menu.addPlayer(String): Adds a player to the match, given a valid nameremovePlayer(String): Removes a player from the match, given a valid namerenamePlayer(String,String): Renames an already present player, given a new valid namesetMatchSeed(long): customizes the match random seed that defines the random sequence of tilesstartLocalMatch(): transitions toLOCAL_MATCHand starts the matchbackToTheMainMenu(): transitions back toMAIN_MENU
LOCAL_MATCHThis is the state in which the game is actually playedplayerPlacesTileAt(String, HexCoordinates): places the current tile on a player's board and triggersgameMatchstate changes (see next section)backToLocalLobby(): goes back to the previous state, resetting all the players' boards and the match seedbackToTheMainMenu()removePlayer(String)
IGameMatch
Public interface for theGameMatchclass, featuring the methods for managing players, setting the match seed and playing tiles. All the methods returnvoidand use exceptions to communicate with the outer layer (i.e.Game)GameMatch
Actual implementation of the match logic. It holds aVector<>of players and theTilePooland it is also implements a state-machine. The states are as follows:SETUP
Accepts commands to add, rename and remove players and to set the game seed. ThestartMatch()method transitions toPLAYPLAYpositionCurrentTileOnPlayerBoard(String, HexCoordinates): Unlike itsGamecounterpart, only manages the placement of current tile into a player's boarddealNextTile(): Deals the next tile in the pool when all the players are done placing the currentbackToSetup(): transitions back to theSETUPstate and resets all players and thecurrentTileIndexin thetilePoolendMatch(): transitions toFINISHwhen all the players are done placing the last tile, and triggers the player's transition to their end state
FINISH
Sits there untilbackToSetup()is called (or the object is set for gc)
IPlayer
Interface of the generic player, that allows managing its state, placing tiles on its board and setting the player name.Player
Implementation of theIPlayerlogic. Again, it features a state-machine that regulates the behavior of its methods.WAIT_MATCH
This state represents both the setup and end-match state. The player name can be configured, and it can transition toPLACINGthroughstartMatch()PLACINGThis is the only state in which tiles can be placed on the player's board throughplaceTile(Tile, HexCoordinates), which also causes transition toWAIT_OTHERon success.WAIT_OTHER
Waits fornextRound()to transition back toPLACINGor forendMatch()to go toWAIT_MATCH
Tile
Class representing the 'classic' Take It Easy tiles (i.e. the ones described in the "How To Play" section above). Values can only be set through the constructor and may be retrieved with getters. This is one of the lowest level entities in the architecture.ITilePool
Interface of the genericTilePool, exposing methods to set and retrieve theseedand to retrieve theTiles from the generated poolTilePool
Implementation of theITilePoollogic to generate tiles for the a 'classic' Take It Easy game. The sequence ofTiles is kept in an array which gets re-populated at eachreset()(which also happens on initialization)
The GUI, implemented with JavaFX, works both as an input and output device to access the methods exposed by IGame and to display the game content on the screen.
The top level component of the gui is an instance of the FXApplication class, which implements the IViewUpdater interface, that allows it to change which JavaFX Scene is displayed in the single game window.
Each scene corresponds to an IOContext, an FXML file and a matching controller of its root node, which also implements the IViewController interface. The latter provides two methods for establishing the link between the IGame, the FXApplication and the current scene controller, and a single method (refreshView(JSONObject)) for updating what's on the screen with the part of the internal IGame state that's relevant for the current view.
Here's an overview of the three IOContexts and associated controllers
This view corresponds to IGame.State.MAIN_MENU, and, besides allowing getting to the local match setup, it features an How to Play and a Credits panel, that are simply displayed on top of the menu.
In the current version, this is the only view that makes no use of the refreshView() method, which shall become useful in future releases (e.g. displaying a MOTD, game version or other non-static info).
The view's logic is implemented in the takeiteasy.GUI.Controller.MainMenuCtrl class, and the callBack linking is mostly done in fxml/main_menu.fxml.
This view corresponds to IGame.State.LOCAL_LOBBY, and exposes the visual handles for calling the corresponding methods of the IGame interface (i.e. managing players, changing seed, starting game or going back). As in MAIN_MENU, most of the JavaFX components in the scene are defined and linked to their callbacks in the corresponding fxml file. The corresponding logic can be found in the takeiteasy.GUI.Controller.LocalLobbyCtrl class.
This view corresponds to IGame.State.LOCAL_MATCH, and exposes the visual handles for actually playing the game. It is more complex than the other two views as it features an additional "GUI logic" layer to allow keeping track of the "focused player", that is, the player whose board is currently being displayed on the screen, and the "focusedCoordinates", to allow the user to select the position on the board where the current tile is to be placed.
Most of the JavaFX components in this scene are built and linked dynamically to the appropriate callback functions. The logic for this view is found within the takeiteasy.GUI.Controller.LocalMatchCtrl class and in two additional classes defined within the takeiteasy.GUI.Controller.LocalMatchComponents subpackage.