

Find optimal image augmentation policies for your dataset automatically. DeepAugment uses Bayesian optimization to discover augmentation strategies that maximize model performance.
$ pip install deepaugment # (or `$ uv add deepaugment`)from deepaugment import optimize
best_policy = optimize(my_images, my_labels, iterations=50)from torchvision.datasets import CIFAR10
from deepaugment import optimize
train_data = CIFAR10(root='./data', train=True, download=True)
X = np.array(train_data.data)[:5000]
y = np.array(train_data.targets)[:5000]
best_policy = optimize(X, y, iterations=50)from torchvision.datasets import CIFAR10
from deepaugment import DeepAugment
aug = DeepAugment(
# Data
X_train, y_train,
X_val, y_val,
# Parameters
n_operations=4, # transforms per policy
train_size=2000,
val_size=500
)
# Optimize
best = aug.optimize(iterations=50, epochs=10)
# Show results
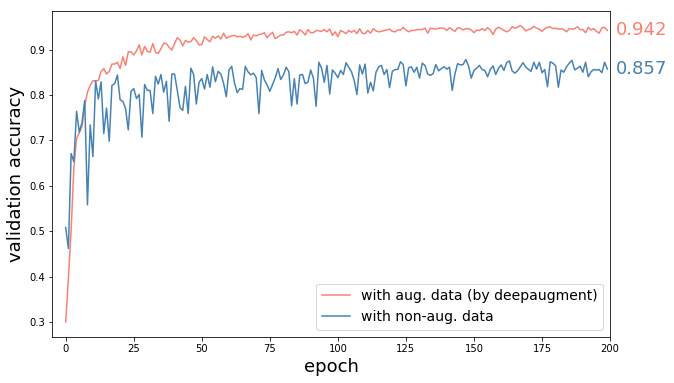
aug.show_best(n=5)- Method: Wide-ResNet-28-10 trained with CIFAR-10 augmented images by best found policies, and with unaugmented images (everything else same).
- Result: 60% reduction in error (8.5% accuracy increase) by DeepAugment

DeepAugment is designed as a scalable and modular partner to AutoAugment (Cubuk et al., 2018). AutoAugment was one of the most exciting publications in 2018. It was the first method using Reinforcement Learning for this problem. AutoAugmentation, however, has no complete open-sourced implementation (controller module not available) preventing users to run it for their own datasets, and takes 15,000 iterations to learn (according to paper) augmentation policies, which requires massive computational resources. Thus most people could not benefit from it even if its source code would be fully available.
DeepAugment addresses these two problems. Its main design goals are:
- minimize the computational complexity of optimization while maintaining quality of results
- be modular and user-friendly
First goal is achieved by following changes compared to AutoAugment:
- Bayesian Optimization instead of Reinforcement Learning
- which requires much less number of iterations (~100 times)
- Minimized Child Model
- decreasing computational complexity of each training (~20 times)
- Less stochastic augmentation search space design
- decreasing number of iterations needed
For achieving the second goal, user interface is designed in a way that it gives user broad configuration possibilities and model selections (e.g. selecting the child model or inputting a self-designed child model).
DeepAugment makes optimization of data augmentation scalable, and thus enables users to optimize augmentation policies without needing massive computational resources. As an estimate of its computational cost, it takes 4.2 hours (500 iterations) on CIFAR-10 dataset which costs around $13 using AWS p3.x2large instance.
To our knowledge, DeepAugment is the first method which utilizes Bayesian Optimization for the problem of data augmentation hyperparameter optimization.
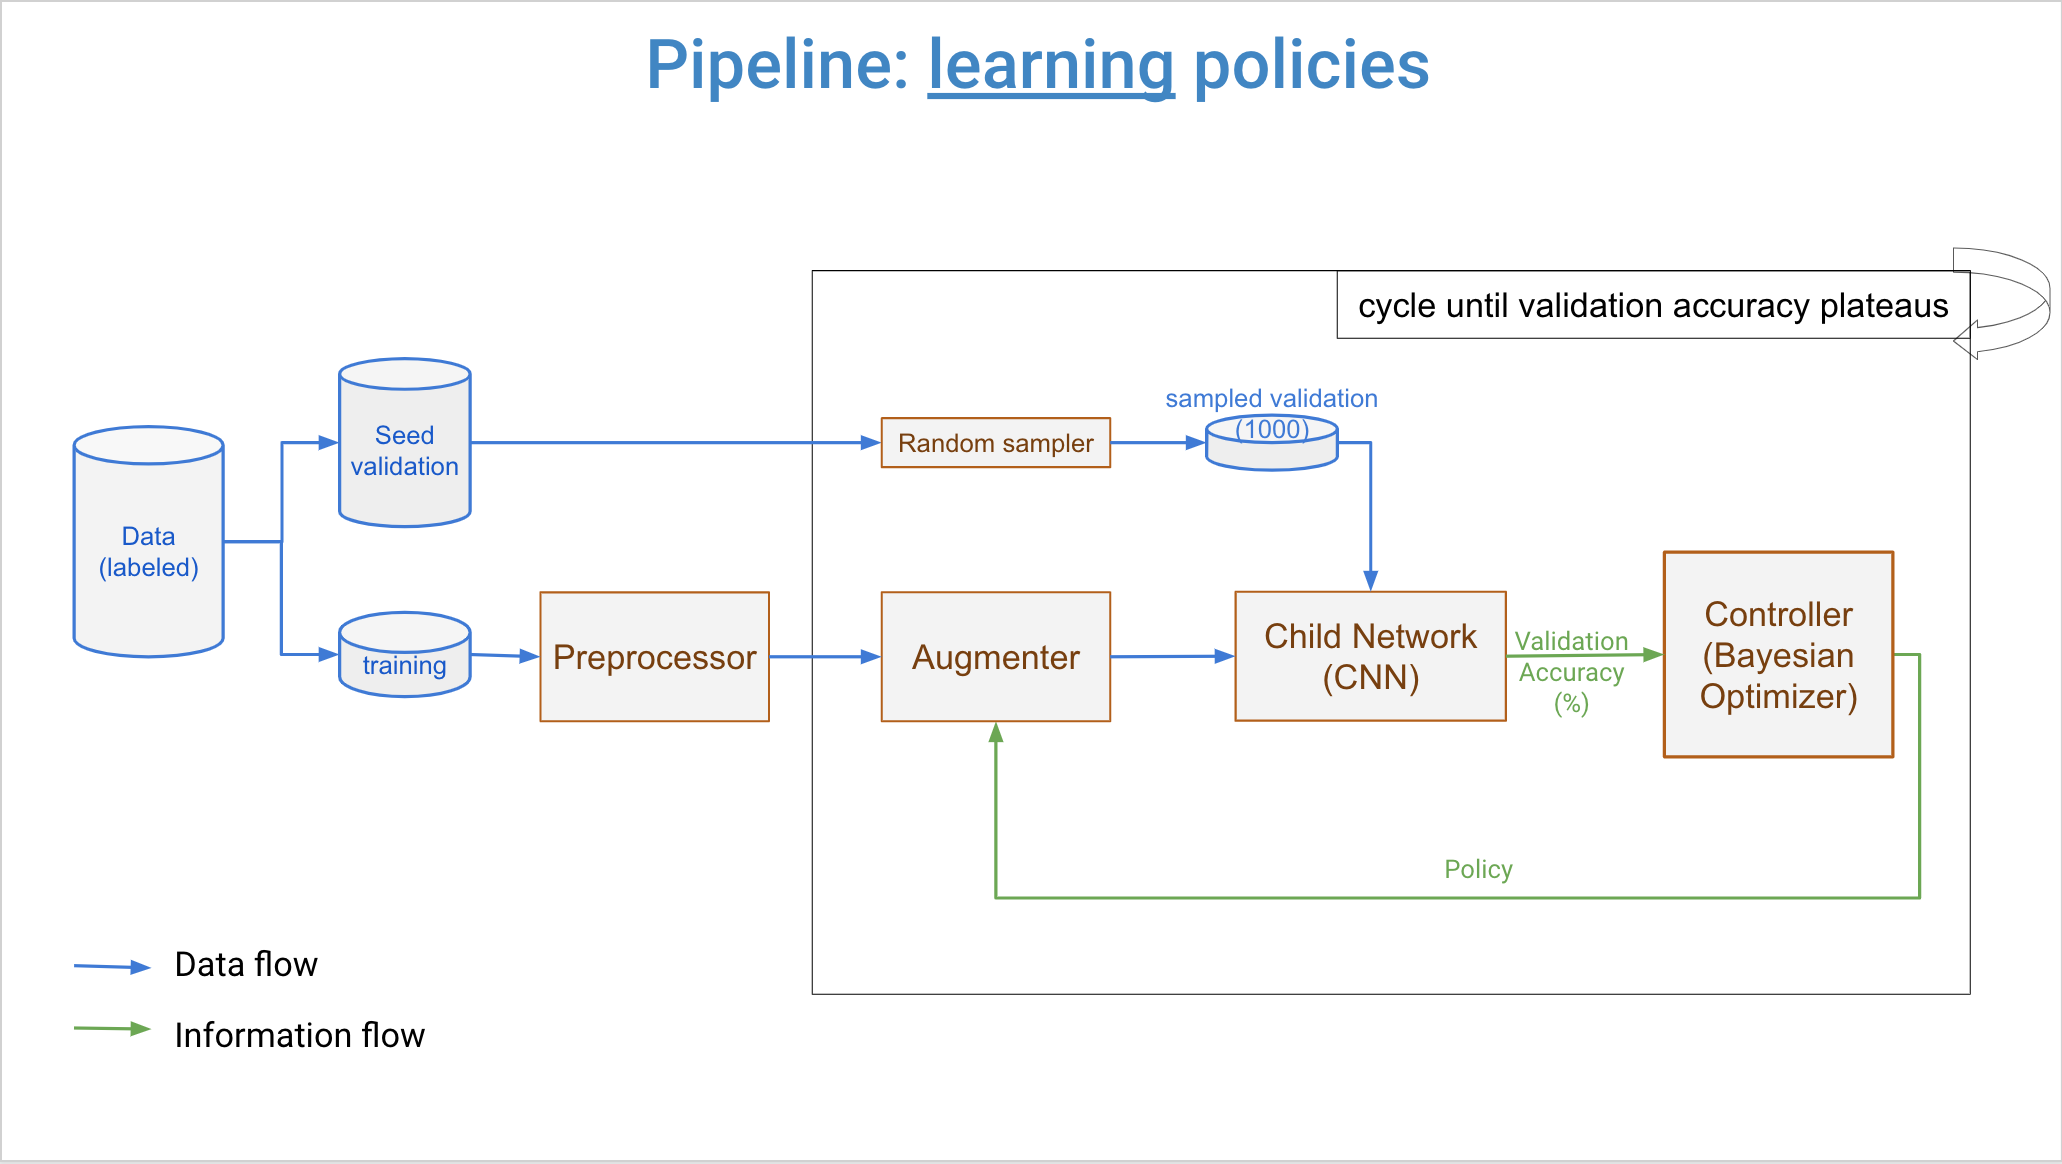
Three major components of DeepAugment are controller, augmenter, and child model. Overall workflow is that controller samples new augmentation policies, augmenter transforms images by the new policy, and child model is trained from scratch by augmented images. Then, a reward is calculated from child model's training history. This reward is returned back to the controller, and it updates its surrogate model with this reward and associated augmentation policy. Then, controller samples new policies again and same steps repeats. This process cycles until user-determined maximum number of iterations reached.
Controller can be set for using either Bayesian Optimization (default) or Random Search. If set to Bayesian Optimization, samples new policies by a Random Forest Estimator and Expected Improvement acquisition function.

In hyperparameter optimization, main choices are random search, grid search, bayesian optimization (BO), and reinforcement learning (RL) (in the order of method complexity). Google's AutoAugment uses RL for data augmentation hyperparameter tuning, but it takes 15,000 iterations to learn policies (which means training the child CNN model 15,000 times). Thus, it requires massive computational resources. Bayesian Optimization on the other hand learns good polices in 100-300 iterations, making it +40X faster. Additionally, it is better than grid search and random search in terms of accuracy, cost, and computation time in hyperparameter tuning(ref) (we can think optimization of augmentation policies as a hyperparameter tuning problem where hyperparameters are concerning with augmentations instead of the deep learning architecture). This result is not surprising since despite Grid Search or Random Search BO selects new hyperparameter as informed with previous results for tried hyperparameters.

Aim of Bayesian Optimization (BO) is finding set of parameters which maximize the value of an objective function. It builds a surrogate model for predicting value of objective function for unexplored parameters. Working cycle of BO can be summarized as:
- Build a surrogate model of the objective function
- Find parameters that perform best on the surrogate (or pick random hyperparameters)
- Execute objective function with these parameters
- Update the surrogate model with these parameters and result (value) of objective function
- Repeat steps 2-4 until maximum number of iterations reached
For more detailed explanation, read this blogpost explaining BO in high-level, or take a glance at this review paper
A policy describes the augmentation will be applied on a dataset. Each policy consists variables for two augmentation types, their magnitude and the portion of the data to be augmented. An example policy is as following:

We use 26 types of transforms (from torchvison v2). They are organized by category as below:
Geometric (8): rotate, flip_h, flip_v, affine, shear, perspective, elastic, random_crop
Color (5): brightness, contrast, saturation, hue, color_jitter
Advanced Color (7): sharpen, autocontrast, equalize, invert, solarize, posterize, grayscale
Blur & Noise (2): blur, gaussian_noise
Occlusion (2): erasing, cutout
Advanced (2): channel_permute, photometric_distort
Child model is trained over and over from scratch during the optimization process. Its number of training depends on the number of iterations chosen by the user, which is expected to be around 100-300 for obtaining good results. Child model is therefore the computational bottleneck of the algorithm. With the current design, training time is ~30 seconds for 32x32 images on AWS instance p3.x2large using V100 GPU (112 TensorFLOPS). It has 1,250,858 trainable parameters for 32x32 images. Below is the diagram of child model:

Standard Child model is a basic CNN where its diagram and details given above. However, you are not limited with that model. You can use your own keras model by assigning it into config dictionary as:
my_config = {"model": my_keras_model_object}
deepaug = DeepAugment(my_images, my_labels, my_config)
Or use an implemented small model, such as WideResNet-40-2 (while it is bigger than Basic CNN):
my_config = {"model": "wrn_40_2"} # depth(40) and wideness-factor(2) can be changed. e.g. wrn_20_4Or use a big model (not recommended unless you have massive computational resources):
my_config = {"model": "InceptionV3"}my_config = {"model": "MobileNetV2"}Reward function is calculated as mean of K highest validation accuracies of the child model which is not smaller than corresponding training accuracy by 0.05. K can be determined by the user by updating opt_last_n_epochs key in config as argument to DeepAugment() class (K is 3 by default).
DeepAugment(
    # Data
    X_train, y_train,
    X_val, y_val,

    # Essential
    model="simple",              # Model architecture
    device="auto",               # "auto", "cuda", "mps", "cpu"
    random_state=42,             # Reproducibility seed

    # Useful
    method="bayesian",           # "bayesian" or "random"
    save_history=True,           # Save optimization history

    # Advanced
    transform_categories=None,   # Filter transforms by category
    custom_reward_fn=None,       # Custom reward function

    # Core
    n_operations=4,              # Transforms per policy
    train_size=2000,             # Training subset size
    val_size=500,                # Validation subset size
)aug.optimize(
iterations=50, # Policies to try
epochs=10, # Training epochs per policy
samples=1, # Runs per policy (for averaging)
batch_size=64, # Training batch size
learning_rate=0.001, # Learning rate
early_stopping=False, # Enable early stopping
patience=10, # Early stopping patience
verbose=True, # Show progress
)"simple"- SimpleCNN (default, fast, 1.2M parameters)
You can restrict augmentations by category via transform_categories. If it is not given, then all transformations will be used.
# Use only geometric transforms
aug = DeepAugment(..., transform_categories=["geometric"])

# Multiple categories
aug = DeepAugment(..., transform_categories=["geometric", "color"])
Categories: geometric, color, advanced_color, blur_noise, occlusion, advanced
See augment.py for all available transforms.

Contributing? See CONTRIBUTING.md for setup and workflow.
Single Source of Truth: Version lives ONLY in pyproject.toml.
We use semantic versioning (MAJOR.MINOR.PATCH).
First time setup:
make setup # Installs native git pre-commit hook for auto-versioningThis creates a git pre-commit hook that automatically bumps patch version on every commit.
Created by pyreverse


[1] Cubuk et al., 2018. AutoAugment: Learning Augmentation Policies from Data (arxiv)
[2] Zoph et al., 2016. Neural Architecture Search with Reinforcement Learning (arxiv)
[3] Shahriari et al., 2016. A review of Bayesian Optimization (ieee)
[4] Dewancker et al. Bayesian Optimization Primer (white-paper)
[5] DeVries, Taylor 2017. Improved Regularization of CNN's with Cutout (arxiv)
Blogs:
- A conceptual explanation of Bayesian Optimization (towardsdatascience)
- Comparison experiment: Bayesian Opt. vs Grid Search vs Random Search (mlconf)
Main dependencies:
- scikit-optimize used for Bayesian optimization
- torch used to create neural networks
- torchvision for image transformations
Original DeepAugment paper:
@software{ozmen2019deepaugment,
  author = {Özmen, Barış},
  title = {DeepAugment: Automated Data Augmentation},
  year = {2019},
  url = {https://github.com/barisozmen/deepaugment}
}