
RockPageBuilder is a Fieldtype/Inputfield module that helps you creating modular content for your project.
- Install RockMigrations and RockFrontend
- Install RockPageBuilder
- RockPageBuilder will automatically add the
WidgetsandContent-Elementsfield to your home template - Add your first block (see section below)
- Render the field on the frontend (see section below)
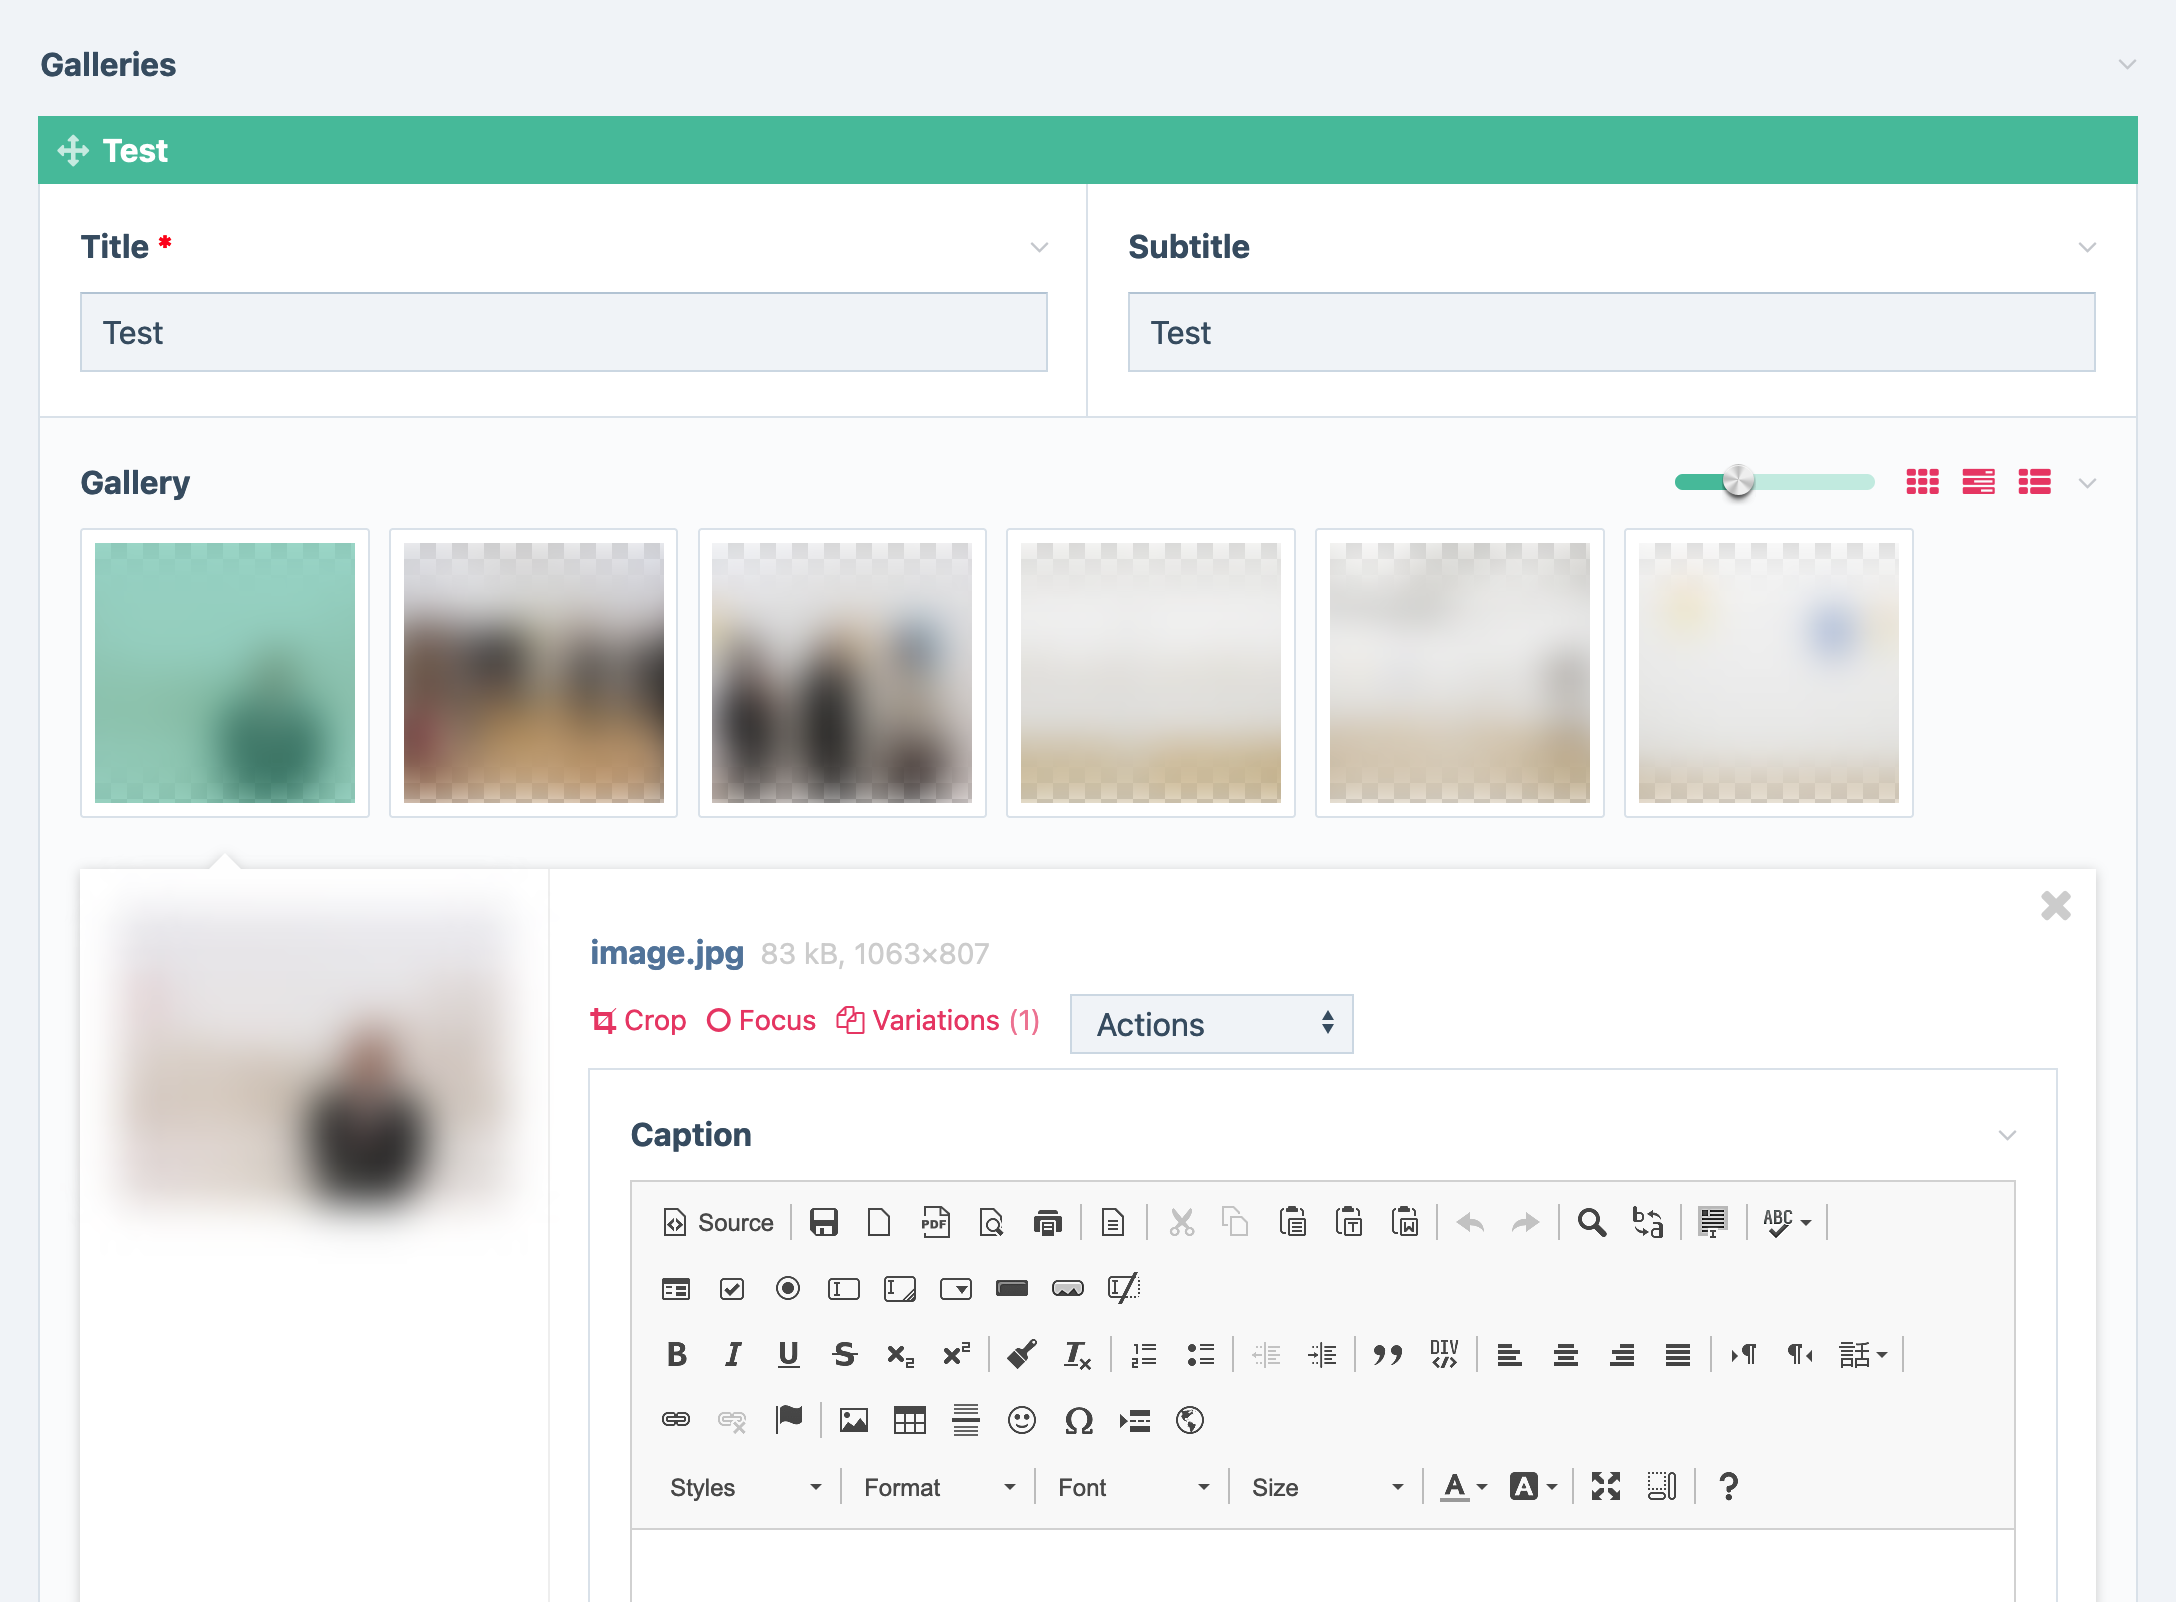
To create a new block simply click on the plus icon in the field that you want to add a new block to:

Enter a name and submit the form - RockPageBuilder will automatically create all the necessary files in the background!
You can define several block settings in the block's PHP file:
<?php

namespace RockPageBuilderBlock;

use RockPageBuilder\Block;

class Demo extends Block
{

  const prefix = "rpb_demo_";

  public function info()
  {
    return [
      'title' => 'Demo-Title',
      'color' => 'lime',
      'icon' => 'picture-o',
      'description' => 'RockPageBuilder Block Setup Demo',
      // 'hideTitle' => true, // shortcut to set title field to hidden
    ];
  }
}
You can either set a fontawesome icon name (like check, user-o [etc]) or you can create your own block-preview-mockups or just make a screenshot of your rendered block and use that as a preview by adding the image as YourBlockName.svg/png/jpg:

In this case the logo-image path is /site/assets/RockPageBuilder/blocks/Demo/Demo.svg.
Rendering the default "blocks" field is as simple as adding this line to your frontend:
// site/templates/home.php
<div id="content">
	Homepage content
	<?= $rockpagebuilder->render() ?>
</div>
You can create as many RockPageBuilder fields as you want. If you added a RPB field called foo you can render it like this:
echo $page->foo->render();By default RockPageBuilder will render a "plus" icon on empty fields. If you don't want that you can provice false as render parameter:
echo $rockpagebuilder->render(false);
echo $page->foo->render(false);RockPageBuilder requires PW 3.0.211 or higher. This is the latest master version (3.0.210) with one additional commit that fixes a problem with the core implementation of repeaters.
Here is the mentioned commit: https://github.com/processwire/processwire/commit/b12c7e903101ba595029ad2fa9e1ed0f8d01f669
And here is the download link of that version of ProcessWire: https://github.com/processwire/processwire/archive/b12c7e903101ba595029ad2fa9e1ed0f8d01f669.zip
I've been using the latest DEV version for years now and can't remember of any problems, so in my opinion there's no need to stick with the master version.
The goals of this module are
- Make it easy for the client to create custom section-based pages
- Make it easy, fast and fun to develop blocks
- Make it possible to reuse blocks across projects by simply copying all block-files
- works only with AdminThemeUikit!
- The module should work with all common fields out of the box. If you find any field that is not fully supported, please let me know and I'll add support for it as it should be quite easy for really any field I can think of.
- Seems that showIf does not work with RockPageBuilder? MPN AnchorHeadline
-- v1 --
- Hide/unpublish blocks
- GUI to edit multiple hidden blocks on the frontend (eg anchor + colorblock)
- caching?
-- v2 --
- undo/restore feature
- copy blocks to other pages
Installationsprozess Wie erstelle ich Content Blöcke (erläutern + warum) Jeder Block ist ein Template (automatisch) -> wo landen die und wie kann ich die bearbeiten. Brauche ich RM oder kann ich das per GUI? Wie mache ich das im Frontend editierbar für den User. Voraussetzungen dafür? Was braucht RPB generell für andere Module? Kann ich es bestehende Projekte nachrüsten? Do's and Don'ts. Repeater + Nesting. Responsive benutzbar?? Konzept von Widgets
You can access every field of your blocks via short method calls. So if you had a field called rockpagebuilder_textblock_foo you could access that field via $page->foo().
That will not only display the value of the field but will also make it editable on the frontend and if you are using RockFrontend + LATTE it will return an HTML object so that you don't need to apply the |noescape filter!
Note: The magic method call will always use the fraction of the fieldname that comes after the last underscore:
my_foo_field --> field()
my_bar_field --> field()
what_so_ever --> ever()
Obviously that would collide for my_foo_field and my_bar_field. In that case just access your fields the regular PW way or rename your fields to my_foofield and my_barfield.
By default (with no argument) the $page->foo() call will return the editable field. There are two more options:
$page->foo(1)will return the raw formatted value$page->foo(2)will return the raw unformatted value$page->foo(3)will return the raw unformatted value as nette html object
public function getLabel() {
  return $this->body;
}
Label with custom HTML:
public function getLabel() {
  return $this->html("<strong>MyBlock:</strong> {$this->title}");
}You can make RockPageBuilder save a yaml configuration of your block's field and template settings like this:
class ExampleBlock extends Block
{
  public function info()
  {
    return [
      'title' => 'IconColumns',
      'yaml' => true,
    ];
  }
}You can use migrations additionally to the YAML recorder:
public function migrateBeforeYaml() {
  // this code will run BEFORE yaml settings have been applied
  // that means settings from the yaml file will overwrite settings from here
}
public function migrateAfterYaml() {
  // this code will run AFTER yaml settings have been applied
  // that means settings from here will overwrite settings from the yaml file
}When working with frontend template engines like latte one drawback is that you can't use ProcessWire's built in transation functions like __('your translatable string'). That's because ProcessWire will only look for such stings in PHP files and also latte has problems understanding those function calls. Since every block has a PHP file we can simply put all translatable strings into that file and access them from the latte file via the $block->x() helper function:
<?php namespace RockPageBuilderBlock;
use RockPageBuilder\Block;
class Demo extends Block {

  public function info() {
    return [
      'icon' => 'check',
      'title' => 'demo block',
      'x' => [
        'my_foo_string' => $this->_('I am the translatable foo string'),
        'my_bar_string' => $this->_('I am the translatable bar string'),

        // this syntax will need the following line before the class statement
        // use function ProcessWire\__;
        'my_bar_string' => __('I am the translatable bar string'),
      ],
    ];
  }
}
And in your template file:
<div style="padding: 50px; border: 2px solid blue;">
  <h1>{$block->x('my_foo_string')}</h1>
  <p>{$block->x('my_bar_string')}</p>
</div>
----------------- everything below is partly outdated!! ------------------------
The most important part are so called blocks that are actually ProcessWire pages with a corresponding template and a custom pageClass.
RockPageBuilder ships with some example blocks that you can use to quickly get started with RockPageBuilder:
// site/init.php (or in module init())
if($modules->isInstalled('RockPageBuilder')) {
  $mx = $modules->get('RockPageBuilder');
  $mx->addBlocks($config->paths->siteModules."RockPageBuilder/demo/");
}
Benefits for users
- You will get a lot more flexibility for your page layouts
- You will get a lot cleaner user interfaces with less other plugins or workarounds, eg: https://user-images.githubusercontent.com/6616448/178727428-c4c72906-ad57-45cf-ac82-49320edb3b99.png
- You will get meaningfol labels of your content blocks (compared to only showing the type of the block)
Technical benefits (compared to other solutions and workarounds)
- You will get cleaner code (OOP)
- Since all blocks are ProcessWire Pages under the hood they are super easy to handle via API or via RockMigrations
Like RepeaterMatrix RockPageBuilder extends the core Repeater Fieldtype, but the concept is very different. As mentioned above every block of a RockPageBuilder is a custom Page (that's the same with RepeaterMatrix) having a custom template (that's not the case with RepeaterMatrix) and also having a custom PageClass (that's also not the case with RepeaterMatrix). RepeaterMatrix on the other hand creates ONE template for all your rpb blocks and then hides or shows the fields that you have defined via the admin interface. That means RepeaterMatrix creates less templates but on the code side you'll end up with ONE page type for MANY block types.
That means that you need to use hooks to customize your pages which has many disadvantages in my opinion. RockPageBuilder on the other hand creates a custom page type for every block type which makes it super convenient to code:
class BlockFoo extends Block {
  public function foo() {
    return 'foo';
  }
}
class BlockBar extends Block {
  public function bar() {
    return 'bar';
  }
}
// vs
$wire->addHookMethod('RepeaterBlockPage::foo', function($event) {
  $page = $event->object;
  if($page->type !== 'rpbTypeFoo') return;
  $event->return = 'foo';
});
$wire->addHookMethod('RepeaterBlockPage::bar', function($event) {
  $page = $event->object;
  if($page->type !== 'rpbTypeBar') return;
  $event->return = 'bar';
});
Another difference is that every Block in RockPageBuilder comes with several helper methods that are handy for customizing the output on your frontend. For example you can add classes on every first rpb item or you can style even blocks differently than odd items (for example to swap images from left to right).
if($block->isEven()) echo "<h1 class='uk-text-right'><?= $block->title ?></h1>";
else echo "<h1><?= $block->title ?></h1>";
Some available methods are:
- $block->isEven()
- $block->isOdd()
- $block->isFirstBlock()
- $block->isLastBlock()
- $block->isLastBlock()
- $block->isEvenType()
Note that isEvenType checks if the item has an odd index but only counts blocks of the same type that are in a row and not interrupted by a block of another type, eg:
A
B
C
C -> true
C
A
B
B -> true
When creating blocks you usually add a bunch of fields. And when working on the frontend you'll likely output those fields. If you stick to the naming convention using class constants for fields named Block::field_yourfield then you can request your fields simply by invoking yourfield():
echo $block->yourfield();This will not only output the content of your field but will also take care of converting it into a Latte HTML object so you don't have to |noescape the output! Wait... wouldn't that open doors for people adding HTML into their inputfields? No, because PW already returns the value of the input encoded. Nice!
Another great thing is that this will automatically make all instances of InputfieldText frontend editable! I love it :)
And what if you needed a custom return value for your yourfield value? Simply implement the yourfield() method in your block's PHP file and that will bypass all the magic and you'll have full control!
RockPageBuilder relies havily on RockMigrations. Migrations are triggered automatically via RockPageBuilder.module.php on modules::refresh.
Update: It is now easier to define blocks for one field:
$mx->loadBlocks("fieldname", $path, "FooNamespace");Blocks need to extend \RockPageBuilder\Block. To avoid naming conflicts you can use custom namespaces. See the demo folder in this module for examples. The minimum viable block is this:
<?php namespace RockPageBuilderBlock;
class MinimumDemo extends \RockPageBuilder\Block {
}
Make sure you save the file as MinimumDemo.php and tell RockPageBuilder about that file (if it is not in an already monitored folder). Use $mx->addBlocks('/your/dir') as shown above.
You can define several important settings for every block in the infot() method of the block.
  public function info() {
    return [
      'icon' => 'bullhorn',
      'title' => 'Jobs',
      'color' => 'PaleGreen',
      'sort' => 900,
      'show' => function($page) {
        // show the button to add this block only on page having title 'Jobs'
        return $page->title == 'Jobs';
      },
    ];
}You can easily define settings for every block. While you could also use regular fields for block settings this method is a lot more efficient and streamlined. The feature uses RockFields for creating the fields. That means fields defined for block settings are runtime fields and don't exist in the database (so you'll also not find them in the fields editor). Also those fields are wrapped in a single Inputfield at the bottom of every block so they will save a lot of unused screen space compared to regular PW fields.
Another benefit is that you can define global settings for your project and then hide or add other settings only for some blocks.
To add settings to your block simply install the RockFields module and add a method settingsTable to your block:
// add this to your block's php file
public function settingsTable(RockFieldsField $field) {
  $settings = $this->getDefaultSettings($field);
  $settings->add([
    'name' => 'blockpadding',
    'label' => 'Block-Padding',
    'value' => $field->input('blockpadding', 'radios', [
      '*s' => 'small padding',
      'm' => 'medium padding',
      'l' => 'large padding',
    ]),
  ]);
  return $settings;
}
Often you want to define global settings for all blocks and extend those settings on some blocks:
// in site/ready.php
/** @var RockPageBuilder $rpb */
$rpb = $this->wire->modules->get('RockPageBuilder');
$rpb->defaultSettings(
  function (BlockSettingsArray $settings, RockFieldsField $field, Block $block) {
    $settings->add([
      'name' => 'bgmuted',
      'label' => 'Add muted background',
      'value' => $field->input('bgmuted', 'checkbox'),
    ]);

    if($block->template == 'fooblock') {
      $settings->add(...);
    }
  }
);
Instead of if/else in the default settings callback you can also remove default settings in a specific block:
// add this to your block's php file
public function settingsTable(RockFieldsField $field) {
  $settings = $this->getDefaultSettings();

  // hide one of the global settings
  $settings->remove('name=foo');
  // add a custom setting to this block
  $settings->add([
    'name' => 'bar',
    'label' => 'BAR-setting',
    'value' => $field->input('bar', 'select', [...]),
  ]);
  // you can also add settings on top:
  $settings->prepend([
    'name' => 'baz',
    'label' => 'BAZ-setting',
    'value' => $field->input('baz', 'select', [...]),
  ]);
  return $settings;
}You can set options for the settings wrapper field in the info() method of your block:
public function info() {
  return [
    ...
    'settings' => false, // no settings field for this block

    'settings' => [
      'label' => 'Settings for this block',
      'icon' => 'check',
      'collapsed' => Inputfield::collapsedNo,
    ],
  ];
}public function settingsInput(RockFieldsField $field) {
return $field->table([
'Headline' => $field->input("headline"),
'Whatever' => $field->input("whatever"),
]);
}
public function settingsSleep(RockFieldsField $field) {
return [
$field->getInputArray("headline"),
$field->getInputArray("whatever"),
];
}If settingsInput returns a string it will be used as value of a markup field. If you provide an array, it will be used as inputfield where you can define label, icon, collapsed state etc:
public function settingsInput(RockFieldsField $field) {
  return [
    'label' => 'My Settings field',
    'icon' => 'check',
    'value' => $field->table([
      'Headline' => $field->input("headline"),
      'Whatever' => $field->input("whatever"),
    ]),
    'collapsed' => Inputfield::collapsedNo,
  ];
}
You have several options to access these settins on the frontend:
// in your block's view file you can access settings via the $settings variable:
if($settins->mySetting == 'foo') echo 'Foo setting is set!';

// get a single setting and set a default value
$mySetting = $block->settings('mySetting', 'default value');

// same as above but different syntax
$mySetting = $settings->mySetting ?: 'default value';The content of the field can be rendered via the render() method of the field data object. This calls the render() method of each block. If you just echo the field value it will show the ids of the pagearray (which is the string representation of the pagearray and is necessary for usage on selectors).
The markup for rendering your block can either be defined as render() method of your block or you can create a view file for your block e.g. /site/assets/blocks/Slider.view.php.
You can also use the latte templating engine by Nette, see https://latte.nette.org/en/syntax
This is an example Image.latte file:
{if $settings->float}
<img
  data-src="{$block->src()}"
  alt="{$block->alt()}"
  uk-img
  class="uk-float-{$settings->align}"
/>
{else}
<section
  class="rpb-image uk-padding uk-text-{$settings->align}"
  uk-lightbox
>
  <a
    href="{$block->src(1600,1600)}"
    data-caption="{$block->alt()}"
    n:tag-if="$settings->lightbox"
  >
    <img
      data-src="{$block->src()}"
      alt="{$block->alt()}"
      uk-img
    />
  </a>
</section>
{/if}Now create a new field and add it to a template. Allowed blocks are defined via hook:
$wire->addHookAfter('RockPageBuilder::getAllowedBlocks', function($event) {
  $field = $event->arguments(0);
  $page = $event->arguments(1);
  if($field->name !== 'rmtest') return;
  $event->return->add([
    'RMDemo\Headline',
    'RMDemo\Markup',
  ]);
});
If you don't define a parent for blocks, the blocks will live under the default blocks datapage.
RockPageBuilder Blocks are a special kind of ProcessWire Pages, but they can just be regular pages with a custom URL endpoint as well!
First you need to define which parent to use in the block's php file:
public function getParent($field, $page)
{
  // use the page where the block is created as parent
  // that means new blocks will be added as child of the page
  return $page->getBlockPage();
}
Then add a template file for your block. You can either create that file manually or use RockMigrations for it:
// in the block's migrate() method:
$rm->createViewFile($this);
Now you should be able to click on "view" in your block's page editor. If you see an empty page you might need to manually include the appendTemplateFile:
include '_main.php';The unformatted value of a RockPageBuilder field is a RockPageBuilder\FieldData object. This class is based on a PageArray and holds all blocks that are saved on that field.
The formatValue of the field is the result of the render() method call on the FieldData object and concats the results of all blocks' render() methods.
Adding existing pages to the field is easy:
$page->getUnformatted('your_rpb_field')
  ->add(1035) // add block id 1035 to this field
  ->save();
You can also add new blocks to your field data:
$field = $page->getUnformatted('your_rpb_field');
$field->add('your-block-tpl', [
  // you can prepopulate fields of the block
  'headline' => 'This is a headline',
  'body' => '<p>Lorem Ipsum</p>',
);
$field->save();
Sometimes it's helpful to reset the field before adding new blocks:
$page->rmtest->reset()->create(...)->create(...)->save();$rm->migrate([
'fields' => [
'your_field' => [
'type' => 'FieldtypeRockPageBuilder',
'tags' => self::tags,
],
],
])Quite often rpb blocks do only have one single field which has the same label as the block. As this would be redundant information and eat up quite some space on the screen RockPageBuilder has a shortcut to easily hide the label of such fields and reduce the field's padding:
$rm->migrate([
  'fields' => [
    self::field_body => [
      'type' => 'textarea',
      'rpb-nolabel' => true,
...Sometimes you want to create a widget that the user can edit in the backend, but you as a developer want to define where the widget gets rendered. For example you could create a global Team widget that you want to render on all job pages. In the job's page template file you can render this widget like this:
// either via widget name:
echo $rockpagebuilder->widgets('Team')->render();

// or you can also render any block like this
// where 123 is the block id
echo $pages->get(123)->renderBlock();
When editing the widget, it will show a warning on which pages the widget will be displayed. RockPageBuilder can not know about the code you added to the template file, therefore you need to tell RockPageBuilder about it:
// in the widget's init() method
// in our example this is in Team.php (the php file of the Team widget)
$this->addHookAfter("RockPageBuilder::getWidgetPages", function($event) {
  $pages = $event->return;
  $pages->add($this->wire->pages->find("template=job"));
  $event->return = $pages;
});Static:
'spaceV' => "50pxrem, 100pxrem",
'spaceID' => "white",
Dynamic:
public function spaceID() {
  return $this->colorClass();
}
Remove margin from first and last element:
<section ...>
  <div class="rpb-nomargin">
    <h1>Foo bar</h1>
    <p>Baz</p>
  </div>
</section>You can add an image of your design as overlay to your website. First enable the feature in your config.php
$config->overlays = true;Then render your overlay where you want it to be placed:
// this will render /site/templates/overlays/home.png on the home template
echo $rockpagebuilder->overlay($page->template);
Then add your design image in /site/templates/overlays and RockPageBuilder will show the preview image as 50% overlay with a nice opacity slider.