Mail Setup
This version of MyTinyTodo is able to create Todo tasks by sending a mail. That's fairly easy, you just need to configure your mail server to execute mytinitodo_api.php of your installation. Since procmail is quite common to process mails, I'll show you how to setup procmail to forward mails of a specific user. If you're using something different you need to find a way yourself, but I'm sure there are lots of tutorials out there to help you. If you have some interesting workarounds feel free to share it with others in the comments.
To parse mails you need to install mailparse. If you have php5-dev installed you can simply call the following:
pecl install mailparse
If the package is successfully installed, activate it by adding the following line to your php.ini (e.g. in /etc/php5/cli/php.ini):
extension=mailparse.so
You need to create a new user. All mails to that user will afterwards end up as a task in your Todo list. If you're on a *nix use this command as a template to create a user todo:
sudo adduser --home /home/youruser --shell /bin/false --disabled-password todo
Open /home/youruser/.procmailrc and add something like this:
VERBOSE=on

PMDIR=$HOME/.procmail
LOGFILE=$PMDIR/procmail.log

:0
| /usr/bin/php5 /path/to/mytinytodo/mytinitodo_api.php importmail
This will forward all mails that arrive to the user youruser to MyTinyTodo. In addition, you should create a directory /home/youruser/.procmail. There you'll find some logs of the procmail processing.
Omit this step if you're fine with sending mails to youruser@yourserver.tld. But you might have created an user like xyz123 but want to send your mails to todo@yourserver.tld, so just open /etc/aliases and append a line like the following:
todo: youruser
Afterwards run newaliases to deploy this new configuration. Congratulations, now all mails sent to todo@yourserver.tld will end up as a new task in your MyTinyTodo instance!
Of course, that's quite risky. Somebody might guess the mail address todo@yourserver.tld, so I recommend to create an alias containing a unique pin, e.g. todo7193@yourserver.tld. It's still convenient if you save this mail address to your address book, but the chance that other people create stupid tasks for you is fairly small.
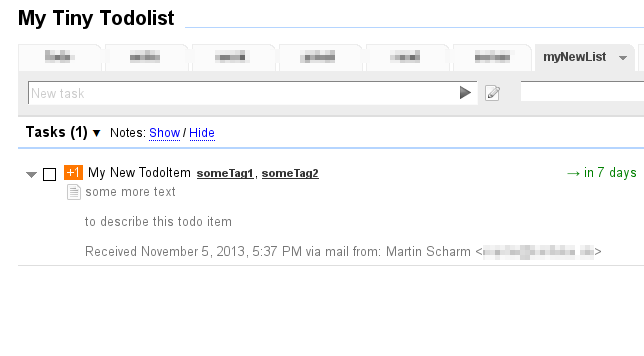
Just send an email to the previously configured mail address and it will by default be added as a todo item to the list MailImport. However, you can change the list and also define a priority and a due date and add some tags. To give you an example have a look at the following mail:
To: todo@your.server.tld
Subject: My New TodoItem
some more text

to describe this todo item

priority:1
tags:someTag1,someTag2
duedate:nextweek
list:myNewList
This mail will end up as a todo item in the list myNewList. The task will get the name My New TodoItem and it will have a priority of 1. Moreover, the tags someTag1 and someTag2 will be assigned to that task and and it will be due to next week. Other valid values for the duedate argument are today, tomorrow, nextweek, nextmonth or a date of the format Y-m-d (e.g. 2013-10-27).
If there isn't already a list called myNewList it will automagically be created.
The result may then look like this: