Create pretty charts of your Nest thermostat data.
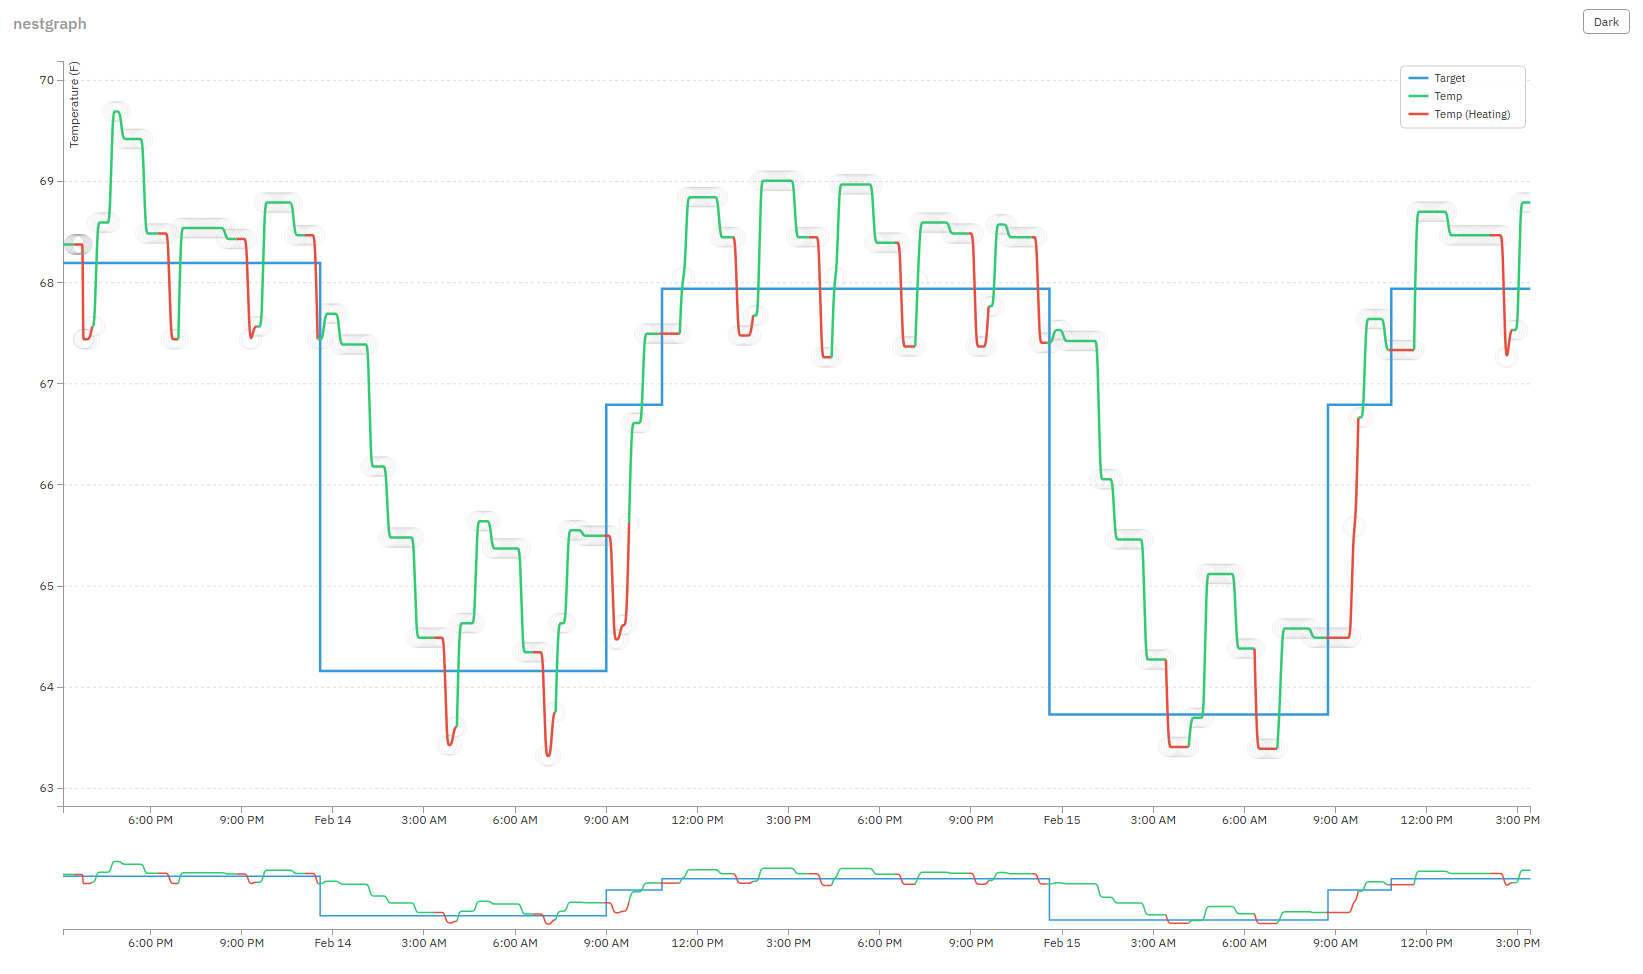
The goal of this project (in 2013) was to see how well the Nest algorithms work. In particuar, the Nest claims to minimize overshoot, which is a common problem with cast-iron radiators. It also claims to know when to start heating in order to hit your target temperature exactly at the time you scheduled it.
Unfortunately, you can't actually access historical temperature data on the Nest website or via the iOS app. It shows you when heating was turned on/off and what the temperature targets were at those times, but it doesn't give you any indication of how well or how poorly the thermostat performed. This could be by design, as it's a lot of information to store. In order to take a closer look, we pull temperature readings periodically and store them in a database so that the data can be inspected in an easily consumable form.
I also wanted an excuse to play with the D3 (Data-Driven Documents) library a little.
Originally, this project used an unofficial nest-api library by Guillaume Boudreau. However, starting in January 2020, the nest-api library became unable to authenticate directly to the Google Nest API due to impending plans to deprecate the Works With Nest program, which officially ended in September 2023.
Thanks to a couple hours of assistance from Claude Code, this project now uses Google's official Smart Device Management (SDM) API.
- Polls Google SDM API to collect thermostat telemetry
- Stores selected data in local MySQL database
- Generates a nice visualization of actual temp vs. set point
- Lower mini-chart is interactive pan-and-zoom of the upper chart
- Hover over the gray circles to get the exact timestamp and temperature
All Nest thermostats linked to a Google account are supported via the SDM API:
- Nest Learning Thermostat (1st, 2nd, 3rd gen)
- Nest Thermostat E
- Nest Thermostat (2020)
- Apache with
mod_cgienabled (serves the visualization and data endpoint) - Python 3 with venv (data collection scripts and CGI endpoint)
- MySQL
- Google Smart Device Management API access ($5 one-time registration)
- In Google Cloud Console, create a project and enable the Smart Device Management API
- Create OAuth 2.0 credentials (Web application type) and add
http://localhost:8080as an authorized redirect URI - Configure the OAuth consent screen (External), add your Google account as a test user, and add the scope
https://www.googleapis.com/auth/sdm.service - Register at Google Device Access Console ($5 one-time fee) and create a project to get your SDM Project ID
- In the Device Access Console, link your OAuth client ID to your SDM project
Enable mod_cgi if it isn't already:
sudo a2enmod cgi
sudo systemctl restart apache2
Ensure your Apache site configuration allows .htaccess overrides for the nestgraph directory (the repo includes an .htaccess that enables CGI for .py files):
<Directory /var/www/html/nestgraph>
    AllowOverride All
</Directory>cd [your-web-root]
git clone https://github.com/chriseng/nestgraph.git
cd nestgraph/cli
cp config.json.template config.jsonEdit cli/config.json and fill in your SDM project ID, Google Cloud OAuth client ID and secret, database credentials, and timezone.
cd cli
python3 -m venv venv
source venv/bin/activate
pip install -r requirements.txtcli/venv/bin/python3 cli/sdm_auth.pyThis opens a browser for Google OAuth consent, in order to authorize your Google Home account to share device data with your project. After authorizing, the refresh token is saved to cli/config.json automatically.
cli/venv/bin/python3 cli/sdm_device_info.pyYou should see your thermostat listed with its current temperature, humidity, and HVAC status.
Choose a password for your local MySQL nest database and update it in cli/config.json and dbsetup. Then create the database:
mysql -u root < cli/dbsetupCreate a cron job to collect data every 5 minutes:
*/5 * * * * /var/www/html/nestgraph/cli/venv/bin/python3 /var/www/html/nestgraph/cli/sdm_collect.py >> /var/log/nestgraph.log 2>&1Optionally, create a cron job to check if your thermostat has gone offline. Populate the recipient email(s) in cli/check_nest.sh if you want email notifications:
*/30 * * * * /var/www/html/nestgraph/cli/check_nest.shPoint your web browser to the nestgraph directory on your webserver!
- Only checks for heating on/off, not cooling (I don't have cooling)
- Only supports a single Nest thermostat (I only have one)
- Assumes you want temperatures displayed in Fahrenheit
- Doesn't automatically redraw when you resize the browser window