scChat: A Large Language Model-Powered Co-Pilot for Contextualized Single-Cell RNA Sequencing Analysis
Welcome to the scChat page. scChat is a pioneering AI assistant designed to enhance single-cell RNA sequencing (scRNA-seq) analysis by incorporating research context into the workflow. Powered by a large language model (LLM), scChat goes beyond standard tasks like cell annotation by offering advanced capabilities such as research context-based experimental analysis, hypothesis validation, and suggestions for future experiments.
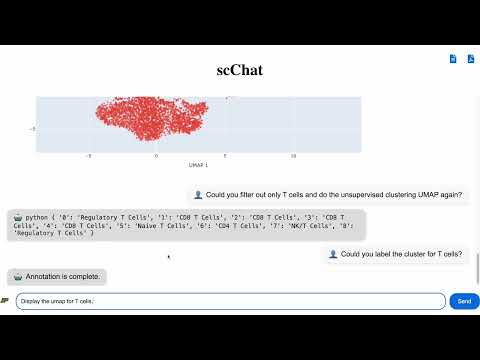
Watch the demo of scChat in action below:
If you found this work useful, please cite this preprint as:
@misc{lu2024scchat,
    title={scChat: A Large Language Model-Powered Co-Pilot for Contextualized Single-Cell RNA Sequencing Analysis},
    author={Yen-Chun Lu and Ashley Varghese and Rahul Nahar and Hao Chen and Kunming Shao and Xiaoping Bao and Can Li},
    year={2024},
    eprint={2024.10.01.616063},
    archivePrefix={bioRxiv},
    doi={10.1101/2024.10.01.616063}
}Data-driven methods such as unsupervised and supervised learning are essential tools in single-cell RNA sequencing (scRNA-seq) analysis. However, these methods often lack the ability to incorporate research context, which can lead to overlooked insights. scChat addresses this by integrating contextualized conversation with data analysis to provide a deeper understanding of experimental results. It supports the exploration of research hypotheses and generates actionable insights for future experiments.
Please read our scChat paper for more motivation and details about how the scChat works.
Model: scChat currently supports analysis using AnnData-formatted single-cell RNA sequencing datasets.
Capabilities: scChat integrates an LLM mutli-agent system with specialized tools to enable tasks, such as cell type annotation, enrichment analysis, and result visualization, all through conversational interactions.

- 🧠 Planner: Searches for function execution and conversation history, parses the query, and decomposes it to generate a plan with several function calls arranged as steps in sequence.
- ⚡ Executor: Performs the function specified in the plan iteratively.
- ✅ Evaluator: Validates the outcome of each function from the executor, handling errors and interrupting the plan to pass error messages to the response generator if needed. Additionally, it checks the availability of remaining steps and determines the next step in the workflow.
- 🔍 Critic: Identifies potentially missing functions by creating a separate plan based on the function results, ensuring targeted analyses of specific cell types with all necessary downstream steps.
- 📝 Response Generator: Compiles all relevant function results to generate the final response to the user's query. After generating the response, it stores the final response and the function execution results in conversation and function histories, respectively.
scChat is highly rely on RAG to perform the function. Below provides the explanation of cell type RAG and pathway RAG for cell type annotation and enrichment analysis.

CellMarker: a manually curated resource of cell markers in human and mouse
Published in Nucleic Acids Research, 2018
DOI: 10.1093/nar/gky900

To set up the project environment and run the server, follow these steps:
pip3 install -r requirements.txtType and enter export in your terminal
OPENAI_API_KEY='your_openai_api_key' - Download Neo4j Desktop 2 (https://neo4j.com/download/)
- Download required dump files (https://drive.google.com/drive/folders/17UCKv95G3tFqeyce1oQAo3ss2vS7uZQE)
- Create a new instance on Neo4j (this step asks you set the password)
- Import the dump files as new databases in the created instance.
- Start the database
- Upload scRNA-seq adata file (.h5ad)
- Upload the pathway vector-based model (.pkl and .faiss), which can be found in this link: https://drive.google.com/drive/u/4/folders/1OklM2u5T5FsjiUvvYRYyWxrssQIb84Ky
- Update specification_graph.json with your Neo4j username, password, system and organ relevant to the database you are using with specific format
- Update sample_mapping.json with adata file corresponding "Sample name", which can be found in adata.obs, and write descriptions for each condition.
- Build the specification_graph.json with your Neo4j username, password, database(
humanormouse), system and organ relevant to the file you are going to test with following format:
{
    "url": "put your url here",
    "username": "put your username here",
    "password": "put your password here",
    "database": "make sure the database name is correct",
    "pathway_rag": "make sure the pathway rag name is correct",
    "sources": [
        {
            "system": "Lymphatic System",
            "organ": "Peripheral blood"
        }
    ]
}
It's also allowed to pass multiple system and organ to the RAG. For example:
{
    "url": "put your url here",
    "username": "put your username here",
    "password": "put your password here",
    "database": "make sure the database name is correct",
    "pathway_rag": "make sure the pathway rag name is correct",
    "sources": [
        {
            "system": "Lymphatic System",
            "organ": "Peripheral blood"
        },
        {
            "system": "Nervous System",
            "organ": "Brain"
        }
    ]
}- Build the sample_mapping.json with adata file corresponding "Sample name", which can be found in adata.obs, and write descriptions for each condition. For example:
{
  "Sample name": "Sample",
  "Sample categories": {
    "0": "p1_pre",
    "1": "p1_post",
    "2": "p6_pre",
    "3": "p6_post",
    "4": "p7_pre",
    "5": "p7_post"
  },
  "Sample description": {
    "p1_pre": "Pre-treatment sample from patient 1",
    "p1_post": "Post-treatment sample from patient 1",
    "p6_pre": "Pre-treatment sample from patient 6",
    "p6_post": "Post-treatment sample from patient 6",
    "p7_pre": "Pre-treatment sample from patient 7",
    "p7_post": "Post-treatment sample from patient 7"
  }
}
Notably, the available systems, organs and tissues are listed in available_cell_RAG.json.
- Run
python3 manage.py migrate For the first time as you install scChat
- Then run
python3 manage.py runserver-
Open your web browser and navigate to:
http://127.0.0.1:8000/schatbot -
Recommended: Use Google Chrome for the best experience.
-
Periodically clearing the cache is recommended to ensure a smooth experience:
- Right-click on the page and select Inspect.
- Go to the Application tab.
- Under Cookies, remove
sessionid. - You may have to run
python manage.py migratein some cases before Step 4.
This will prevent previous chat sessions from being reprocessed.
The datasets used for testing and examples for sample_mapping.json and specification_graph.json can be found at https://docs.google.com/spreadsheets/d/1NwN5GydHn0B3-W0DLcAfvnNtZVJEMUgBW9YyzXnS83A/edit?usp=sharing