Foodiebear PetFeeder helps pet owners to stay connected with their loved ones whenever, wherever. This project includes a DIY pet feeder powered by Raspberry Pi, a MERN web app powered by Azure cloud platform, and an Alexa skill powered by AWS. Whether your pets need to be fed breakfast before you wake up, dinner while you're working late, or simply a treat when you are busy in the house, you should stay tuned to this awesome project 🐶🐱🐼
To learn more about this project, please read the initial product plan here or the final architecture diagram below:
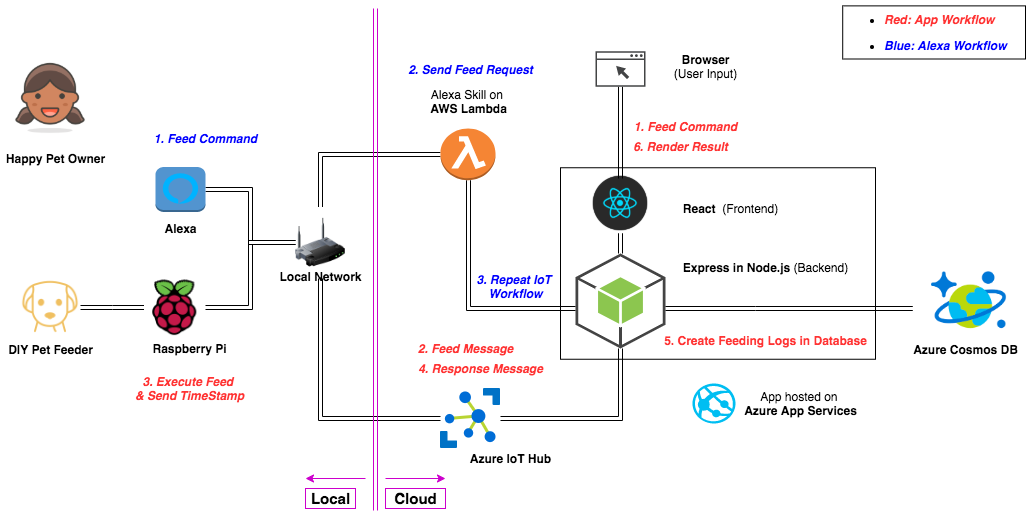
This is the hardware part of the FoodieBear Pet Feeder project. This repo contains instructions to assemble the parts, create a server on Raspberry Pi, and register the device with Azure IoT Hub.
Materials:
- Raspberry Pi Revision 2 (w/ SD Card, Wifi Adapter)
- L298N Motor Driver
- DC Motor
- Motor Coupler
- Food Dispenser
- Breadboard Jumper Wires
- AC Adapter
Connect Pi with the DC motor through L298N driver:
https://www.youtube.com/watch?v=2bganVdLg5Q
https://howchoo.com/g/mjg5ytzmnjh/controlling-dc-motors-using-your-raspberry-pi
NOTE: Please refer to this GPIO Pinout diagram
Attach DC motor to the food dispencer:
Reference the "Modify Dispencer" session under "Setup Box Components" of this tutorial
Dependencies:
- python 3
- RPi.GPIO
- azure-iot-device
- azure-iot-hub
NOTE: Please use$ pip3 install <library-name>for needed
Python code for server on Rasberry Pi: See details in the pypi.py file within this repo
Open an account with Azure and add the following services to your account: [IoT hub] (https://docs.microsoft.com/en-us/azure/iot-hub/iot-hub-create-through-portal)
Create .env file and update the "DEVICE_CONNECTION_STRING" accordingly
Be sure to follow the orders:
- Plug-in power for the moto driver first
- Plug-in power for the Pi
- SSH into the Pi from your computer - Instruction
- Setup wifi on your Pi - Instruction
- cd into the root folder and run
$ python3 pypi.py
- Part II. Web App & Azure Cloud: https://github.com/rinostar/capstone-petfeeder-app
- Part III. Alexa Skill & Lambda Function: https://github.com/rinostar/capstone-petfeeder-alexa
Github: @rinostar
Email: codingrinostar@gmail.com
In addition to authors of the links mentioned above, I want to thank:
- diy petfeeder on Youtube for the inspiration,
- redklouds on Github for the collaboration,
- and Ada community for the support.
Thank you! Until next time 🌟