-
Notifications
You must be signed in to change notification settings - Fork 1
Feature go2 go2w slam guide #23
New issue
Have a question about this project? Sign up for a free GitHub account to open an issue and contact its maintainers and the community.
By clicking “Sign up for GitHub”, you agree to our terms of service and privacy statement. We’ll occasionally send you account related emails.
Already on GitHub? Sign in to your account
Merged
Merged
Changes from all commits
Commits
Show all changes
4 commits
Select commit
Hold shift + click to select a range
File filter
Filter by extension
Conversations
Failed to load comments.
Loading
Jump to
Jump to file
Failed to load files.
Loading
Diff view
Diff view
There are no files selected for viewing
This file contains hidden or bidirectional Unicode text that may be interpreted or compiled differently than what appears below. To review, open the file in an editor that reveals hidden Unicode characters.
Learn more about bidirectional Unicode characters
This file contains hidden or bidirectional Unicode text that may be interpreted or compiled differently than what appears below. To review, open the file in an editor that reveals hidden Unicode characters.
Learn more about bidirectional Unicode characters
This file contains hidden or bidirectional Unicode text that may be interpreted or compiled differently than what appears below. To review, open the file in an editor that reveals hidden Unicode characters.
Learn more about bidirectional Unicode characters
| Original file line number | Diff line number | Diff line change |
|---|---|---|
| @@ -0,0 +1,212 @@ | ||
| --- | ||
| sidebar_position: 1 | ||
| --- | ||
|
|
||
| # Go2 & Go2-W | ||
|
|
||
| ## 1. Setup | ||
|
|
||
| Before jumping into SLAM, ensure that all required configurations are set up on the User PC. | ||
|
|
||
| ### 1.1 What You Need | ||
|
|
||
| - **User PC** running Ubuntu 20.04 or 22.04 | ||
| - Ubuntu 22.04 is recommended. | ||
| - A laptop is recommended. | ||
| - You may refer to the [Ubuntu Installation Guide](https://ubuntu.com/tutorials/install-ubuntu-desktop). | ||
| - **ROS2 Foxy or Humble** installed | ||
| - Humble is recommended. | ||
| - You may refer to the [ROS2 Humble Installation Guide](https://docs.ros.org/en/humble/Installation/Ubuntu-Install-Debs.html). | ||
| - After installing ROS2, in the terminal, run **`export ROS_DOMAIN_ID=0`**. | ||
| - **Unitree Software Development Kit** installed and set up | ||
| - You may refer to the [Unitree_SDK_Go2 Installation Guide](https://support.unitree.com/home/en/developer/Quick_start) or the [Unitree_SDK_Go2-W Installation Guide](https://support.unitree.com/home/en/Go2-W_developer/Quick_Start). | ||
| - **Unitree ROS2 Services Interface** installed | ||
| - You may refer to the [ROS2 Services Interface Installation Guide](https://support.unitree.com/home/en/developer/ROS2_service). | ||
| - Ensure Cyclone DDS is used as the middleware. | ||
| - **Ethernet cable** | ||
| - Used to connect the laptop to the Robot's PC. | ||
| - A cable longer than 5 meters is recommended. | ||
|
|
||
| ### 1.2 Additional Preparation | ||
|
|
||
| - **Payload Installation** | ||
| - You may refer to the [Payload Installation Guide](https://support.unitree.com/home/en/developer/Payload). | ||
| - Make sure the Expansion Dock and External LiDAR (XT16 or MID-360) are installed properly. | ||
| - **SLAM Service Expansion Dock Module Update Package** | ||
| - You may refer to the [Expansion Dock Configuration Guide](https://support.unitree.com/home/en/developer/module_update). | ||
|
|
||
| ### 1.3 Notes | ||
|
|
||
| - The RViz configuration files can be found in the **Expansion Dock Module Update Package** installed in the previous steps. | ||
| - **Robot's PC details:** | ||
| - Username: `unitree` | ||
| - Password: `123` | ||
| - IP address: `192.168.123.18` | ||
| - Secure Shell into the Robot's PC by running **`ssh unitree@192.168.123.18`** in the terminal. | ||
| - When prompted, enter the password above. | ||
| - Select **1** when prompted for the ROS version. | ||
| - If you encounter issues when running commands in the terminal, try adding **`sudo`** at the front (e.g. **`sudo nano /etc/default/grub`**). | ||
| - If you are using **ROS2 Humble** instead of **ROS2 Foxy**, replace any references to *Foxy* with *Humble* when following the steps above. | ||
|
|
||
| --- | ||
|
|
||
| ## 2. Configuration | ||
|
|
||
| ### 2.1 Wired Connection | ||
|
|
||
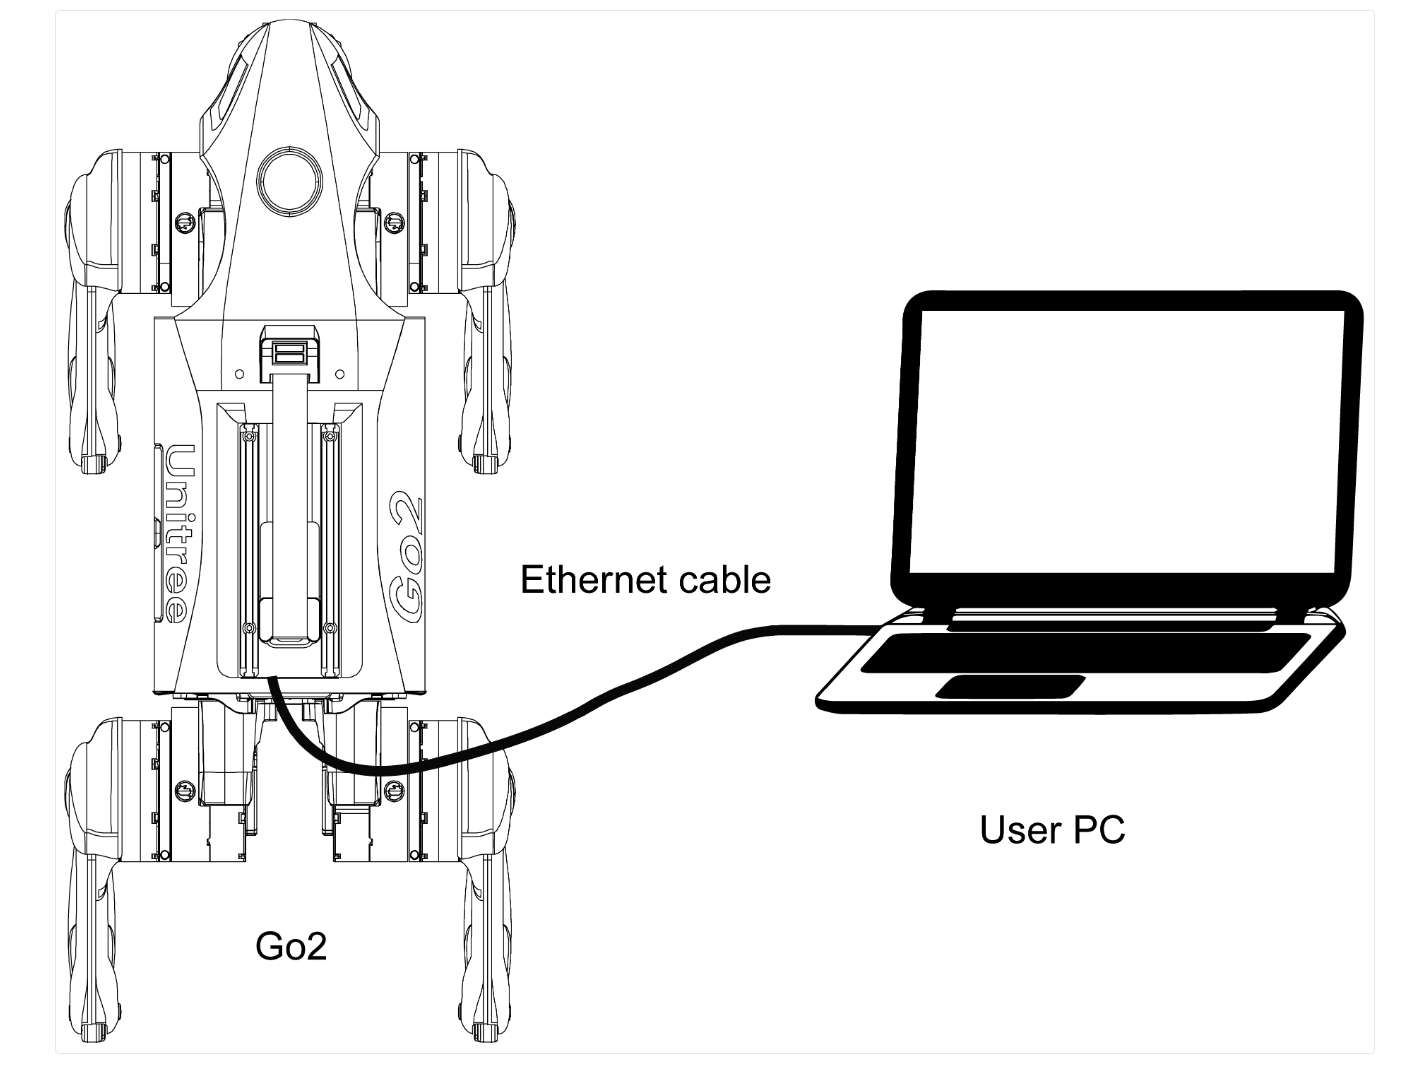
| - Make sure the User PC is connected to the Expansion Dock on the Go2/Go2-W as shown below. | ||
|  | ||
|
|
||
| - Ensure that the network interface connected to the robot is configured with the following settings. | ||
|  | ||
|
|
||
| - In the terminal: | ||
| - Verify the connection by running: | ||
| - **`ping 192.168.123.18`** for the Robot's PC | ||
| - **`ping 192.168.123.20`** for the External LiDAR | ||
| - **`ping 192.168.123.161`** for the Motion Control PC | ||
| - Verify the ROS2 setup by running: | ||
| - **`source unitree_ros2/setup.sh`** | ||
| - **`ros2 topic list`** | ||
| - Expected output: | ||
|  | ||
|
|
||
| --- | ||
|
|
||
| ### 2.2 Expansion Dock Configuration for SLAM | ||
|
|
||
| - Check that the Power Mode of the Robot's PC is set to 0:MAXN by passing the command **sudo /usr/sbin/nvpmodel -q**. If it is not the desired Power Mode, then pass the command **sudo /usr/sbin/nvpmodel -m 0** to set it. | ||
| - Modify the Maximum Receive Buffer Size in the cyclonedds by passing the following command to the Robot's PC: | ||
| - **`sudo su`** | ||
| - **`echo "net.core.rmem_max=52428800" >> /etc/sysctl.conf`** | ||
| - **`echo "net.core.wmem_max=52428800" >> /etc/sysctl.conf`** | ||
| - **`sysctl -p`** | ||
| - **`exit`** | ||
| - **`sudo chmod 777 -R /unitree/module/unitree_slam`** | ||
| - Make sure you have the [Unitree Software Development Kit](#12-additional-preparation) installed. | ||
| - Make sure the [SLAM Service Expansion Dock Module Update Package](#12-additional-preparation) is installed. | ||
| - In the User PC, clone the Unitree Software Development Kit repository. | ||
| - **`sudo git clone https://github.com/unitreerobotics/unitree_sdk2.git`** | ||
| - Transfer the Software Development Kit from User PC to the Robot's PC. | ||
| - **`scp -r ~/unitree_sdk2 unitree@192.168.123.18:/home/unitree/`** | ||
| - Clean, rebuild and install Unitree Software Development Kit in the Robot’s PC. | ||
| - **`cd /home/unitree/unitree_sdk2`** | ||
| - **`sudo mkdir -p build && cd build`** | ||
| - **`sudo cmake ..`** | ||
| - **`sudo make install`** | ||
| - Build the SLAM Example | ||
| - **`cd /unitree/module/unitree_slam/example`** | ||
| - **`sudo mkdir -p build && cd build`** | ||
| - **`sudo cmake -Dunitree_sdk2_DIR=/home/unitree/unitree_sdk2/build/unitree_sdk2 ..`** | ||
| - **`sudo make`** | ||
|
|
||
| ### 2.3 LiDAR Parameter Configuration | ||
|
|
||
| - Check for the model of the external LiDAR installed. | ||
| <div className="row"> | ||
| <div className="col col--6"> | ||
| <div style={{ textAlign: 'center' }}> | ||
| <img | ||
| src="https://www.livoxtech.com/dps/2d9e037e6d457ef7ffec037f7d16dcf8.png" | ||
| alt="Livox LiDAR Mid-360" | ||
| style={{ height: 180 }} | ||
| /> | ||
| <p>Livox LiDAR Mid-360</p> | ||
| </div> | ||
| </div> | ||
|
|
||
| <div className="col col--6"> | ||
| <div style={{ textAlign: 'center' }}> | ||
| <img | ||
| src="https://www.hesaitech.com/wp-content/uploads/2024/11/XT.png" | ||
| alt="Hesai XT16 LiDAR" | ||
| style={{ height: 180 }} | ||
| /> | ||
| <p>Hesai XT16 LiDAR</p> | ||
| </div> | ||
| </div> | ||
| </div> | ||
|
|
||
| - Acquire the YSN value. If not available, please contact [Weston Robot Support Team](https://forms.office.com/pages/responsepage.aspx?id=NTNVCC0zFkWzGo_3Vcs_4KxdsbBJKHVIkFlOJLtAMMlUQkJZMU8wM1EyTkRUVUJCVzA2WVdQNzBSMCQlQCN0PWcu&route=shorturl). | ||
| - Using the Robot's PC, enter the following commands to view the SLAM interface parameters. | ||
| - **`cd /unitree/module/unitree_slam/config/slam_interfaces_server_config`** | ||
| - **`sudo vim param.yaml`** | ||
| - Move your arrow keys to the desired field and press the "i" key on your keyboard to enter edit mode. Enter the desired LiDAR model and YSN value. After editing, press the "esc" key to exit editing mode and press the ":", "w" then "q" buttons in order to save and exit. Type ":", "q" then "a" to exit without saving. Please refer to below example. | ||
|  | ||
| - Using the Robot's PC, enter the following commands to view the Gridmap Configurations. | ||
| - **`cd /unitree/module/unitree_slam/config/gridmap_config`** | ||
| - **`sudo vim config.yaml`** | ||
| - Move your arrow keys to the desired field and press the "i" key on your keyboard to enter edit mode. Comment out the line which coresponds to the non-desired LiDAR model by adding "#" to the start of the line and remove the "#" from the line with the desired LiDAR model. After editing, press the "esc" key to exit editing mode and press the ":", "w" then "q" buttons in order to save and exit. Type ":", "q" then "a" to exit without saving. Please refer to below example. | ||
|  | ||
|
|
||
| ### 2.4 SLAM Usage | ||
|
|
||
| > The following steps are performed on the Go2/Go2-W PC via [Secure Shell](#13-notes). | ||
|
|
||
| #### Run SLAM | ||
| - Open a terminal (Terminal 1). | ||
| - **`cd /unitree/module/unitree_slam/bin`** | ||
| - **`sudo ./unitree_slam`** to start the SLAM service. | ||
| - Keep this terminal open. | ||
|
|
||
| #### Run the LiDAR Driver | ||
| - Open a new terminal (Terminal 2). | ||
| - **`cd /unitree/module/unitree_slam/bin`** | ||
| - Run the appropriate driver based on the installed LiDAR: | ||
| - **`sudo ./mid360_driver`** or | ||
| - **`sudo ./xt16_driver`** | ||
| - Keep this terminal open. | ||
|
|
||
| #### Run keyDemo | ||
| - Open a new terminal (Terminal 3). | ||
| - **`cd /unitree/module/unitree_slam/bin`** | ||
| - **`sudo ./keyDemo eth0`** | ||
| - The terminal should display the following output: | ||
|  | ||
|
|
||
| --- | ||
|
|
||
| > The following steps are performed on the **User PC**. | ||
|
|
||
| #### Run RViz | ||
| - Open a terminal. | ||
| - **`source unitree_ros2/setup.sh`** | ||
| - **`cd unitree/module/unitree_slam/rviz2/`** | ||
| - **`rviz2 -d mapping.rviz`** | ||
| - This allows monitoring of the mapping process. | ||
| - You may also run **`rviz2 -d relocation.rviz`** to monitor the relocation and localization process. | ||
|
|
||
| --- | ||
timothy-weston marked this conversation as resolved.
Show resolved
Hide resolved
|
||
|
|
||
| > The following steps involve robot manipulation using the <u>RC (remote controller)</u> and interaction with <u>Terminal</u> 3. | ||
|
|
||
| #### Mapping | ||
| - Press **Q** to start mapping. | ||
| - Make sure the robot is at the exact intended start location and is standing. | ||
| - Move the robot around the area <u>slowly and thoroughly</u>. Repeat this process twice to achieve a more detailed and accurate map. | ||
| - On <u>Terminal 3</u>, press **W** to stop mapping. | ||
| - Return the robot to the exact position and orientation of the original start location. | ||
|
|
||
| #### Relocation and Positioning | ||
| - On <u>Terminal 3</u>, press **A** to start relocation and positioning initialization. | ||
| - Press **S** to add the first node (checkpoint), which should always be the start location. | ||
| - Move the robot to desired checkpoints using the RC and save each position by pressing **S**. | ||
| - **Note:** | ||
| - The distance between the target point and the current position must not exceed <u>10 meters</u>. | ||
| - The minimum distance between each node is recommended to be more than <u>1.5 meters</u>. | ||
| - The robot moves in straight lines. | ||
| - Due to the LiDAR field of view, obstacles should be at least <u>20 cm</u> high. | ||
| - Avoid sharp turns. | ||
| - Turn off the obstacle avoidance mode that comes with the robot, and the head light will turn blue. | ||
| - After saving all desired nodes, press any other key in <u>Terminal 3</u> to exit SLAM navigation mode. | ||
|
|
||
| #### Localization | ||
| - Return the robot to the exact position and orientation of the original start location. | ||
| - Review the map and relocation process on the User PC. | ||
| - On <u>Terminal 3</u>, press **A** to localize. | ||
| - Press **D** to start the navigation loop. | ||
| - After completing all saved nodes, the robot will return to the original start location. | ||
| - Robot will move along the nodes in order and return to original position with reverse order e.g. 1-->2-->3-->2-->1 (repeats until stopped) | ||
| - **Note:** | ||
| - To pause navigation, press **Z** on <u>Terminal 3</u>, then press **CTRL+C** on all terminals. | ||
| - Using the RC will immediately stop SLAM navigation and takes precedence. | ||
Loading
Sorry, something went wrong. Reload?
Sorry, we cannot display this file.
Sorry, this file is invalid so it cannot be displayed.
Loading
Sorry, something went wrong. Reload?
Sorry, we cannot display this file.
Sorry, this file is invalid so it cannot be displayed.
Loading
Sorry, something went wrong. Reload?
Sorry, we cannot display this file.
Sorry, this file is invalid so it cannot be displayed.
Loading
Sorry, something went wrong. Reload?
Sorry, we cannot display this file.
Sorry, this file is invalid so it cannot be displayed.
This file contains hidden or bidirectional Unicode text that may be interpreted or compiled differently than what appears below. To review, open the file in an editor that reveals hidden Unicode characters.
Learn more about bidirectional Unicode characters
Add this suggestion to a batch that can be applied as a single commit.
This suggestion is invalid because no changes were made to the code.
Suggestions cannot be applied while the pull request is closed.
Suggestions cannot be applied while viewing a subset of changes.
Only one suggestion per line can be applied in a batch.
Add this suggestion to a batch that can be applied as a single commit.
Applying suggestions on deleted lines is not supported.
You must change the existing code in this line in order to create a valid suggestion.
Outdated suggestions cannot be applied.
This suggestion has been applied or marked resolved.
Suggestions cannot be applied from pending reviews.
Suggestions cannot be applied on multi-line comments.
Suggestions cannot be applied while the pull request is queued to merge.
Suggestion cannot be applied right now. Please check back later.
Uh oh!
There was an error while loading. Please reload this page.